Apple Login
iOS13에서 Sign In With Apple 이 공개되었습니다.
Facebook, Google 등 Oauth를 이용한 간편로그인이 활성화 된 가운데 Apple이 개인정보보호라는 무기를 들고 Third-party login 진영에 참여했습니다.
애플에서 자랑하는 Apple Login의 장점을 먼저 짚고 넘어가봅니다.
Google, Facebook은 사용자 정보를 이용해 로그인을 하는 대신 사용자의 정보를 수집하게 됩니다. 이 정보는 결국 각 서비스 회사의 수익으로 이어지게 됩니다. 사용자는 개인정보를 제공하고 편리하게 인증을 할 수 있다는 장점이 있죠.
반면, 애플은 로그인 과정에서 개인정보보호 정책을 내세워 Email도 숨긴 상태로 로그인도 가능하며 1회용 로그인기능도 제공합니다. iOS13이상부터 지원되기 때문에 아직 많은 앱에 적용되기는 힘들겠지만 추후 보편화 될 수 있을거라고 생각합니다.
Firebase에서의 지원 (Beta)
Firebase에서는 Authentication이라는 이름으로 쉽게 로그인을 할 수 있는 플랫폼을 제공하고 있습니다. 얼마전 Beta 서비스로 Apple sign in 기능을 지원하기 시작했습니다.
이제부터 Firebase의 Authentication을 이용해 앱에 Apple Sign 기능을 제공하는 방법을 소개합니다.
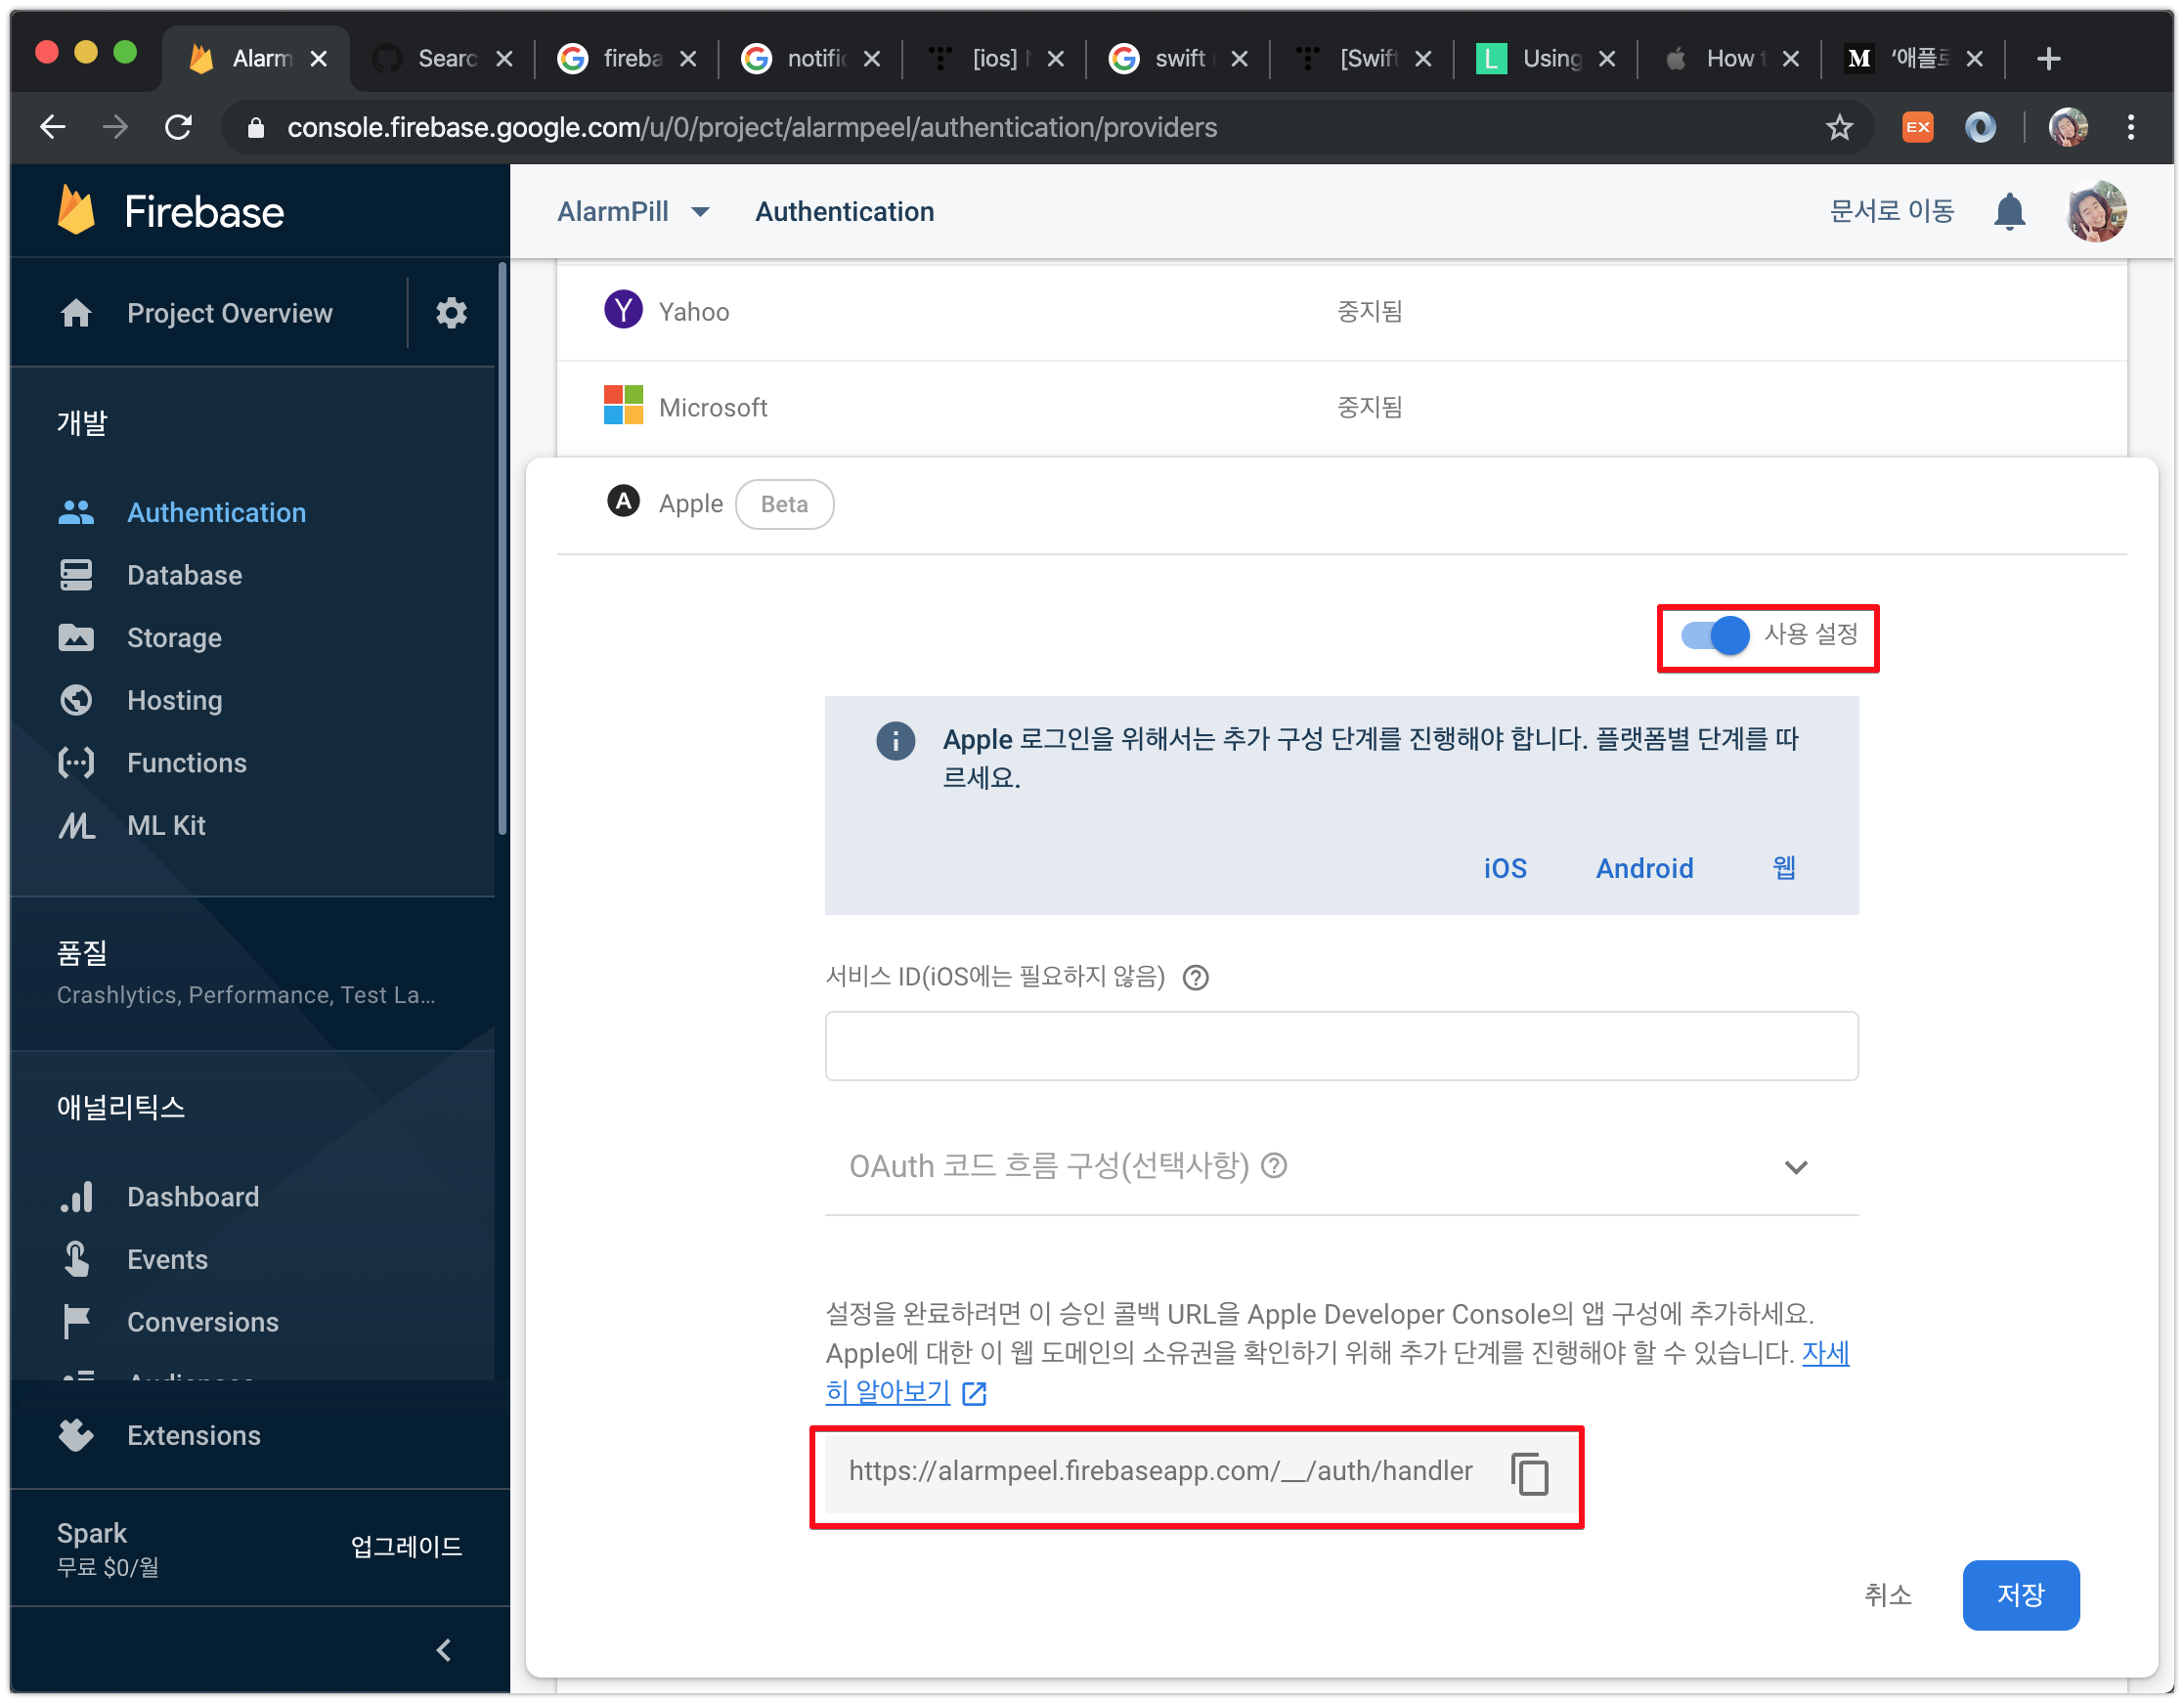
1. [Firebase Console] Firebase Authentication > Apple Sign in 활성화
- Firebase Console > Authentication > 로그인 방법
Apple 항목을 사용 설정으로 변경 후 저장합니다.
저장 후 화면 하단의 콜백URL은 추후 애플 개발자 센터에 등록이 필요하니 메모해둡니다.
2. [Firebase Console] Firebase Hosting 설정
- Firebase Console > Hosting > 시작하기
Firebase Hosting을 이용하는 것은{프로젝트 이름}.firebaseapp.com을 이용하기 위함입니다.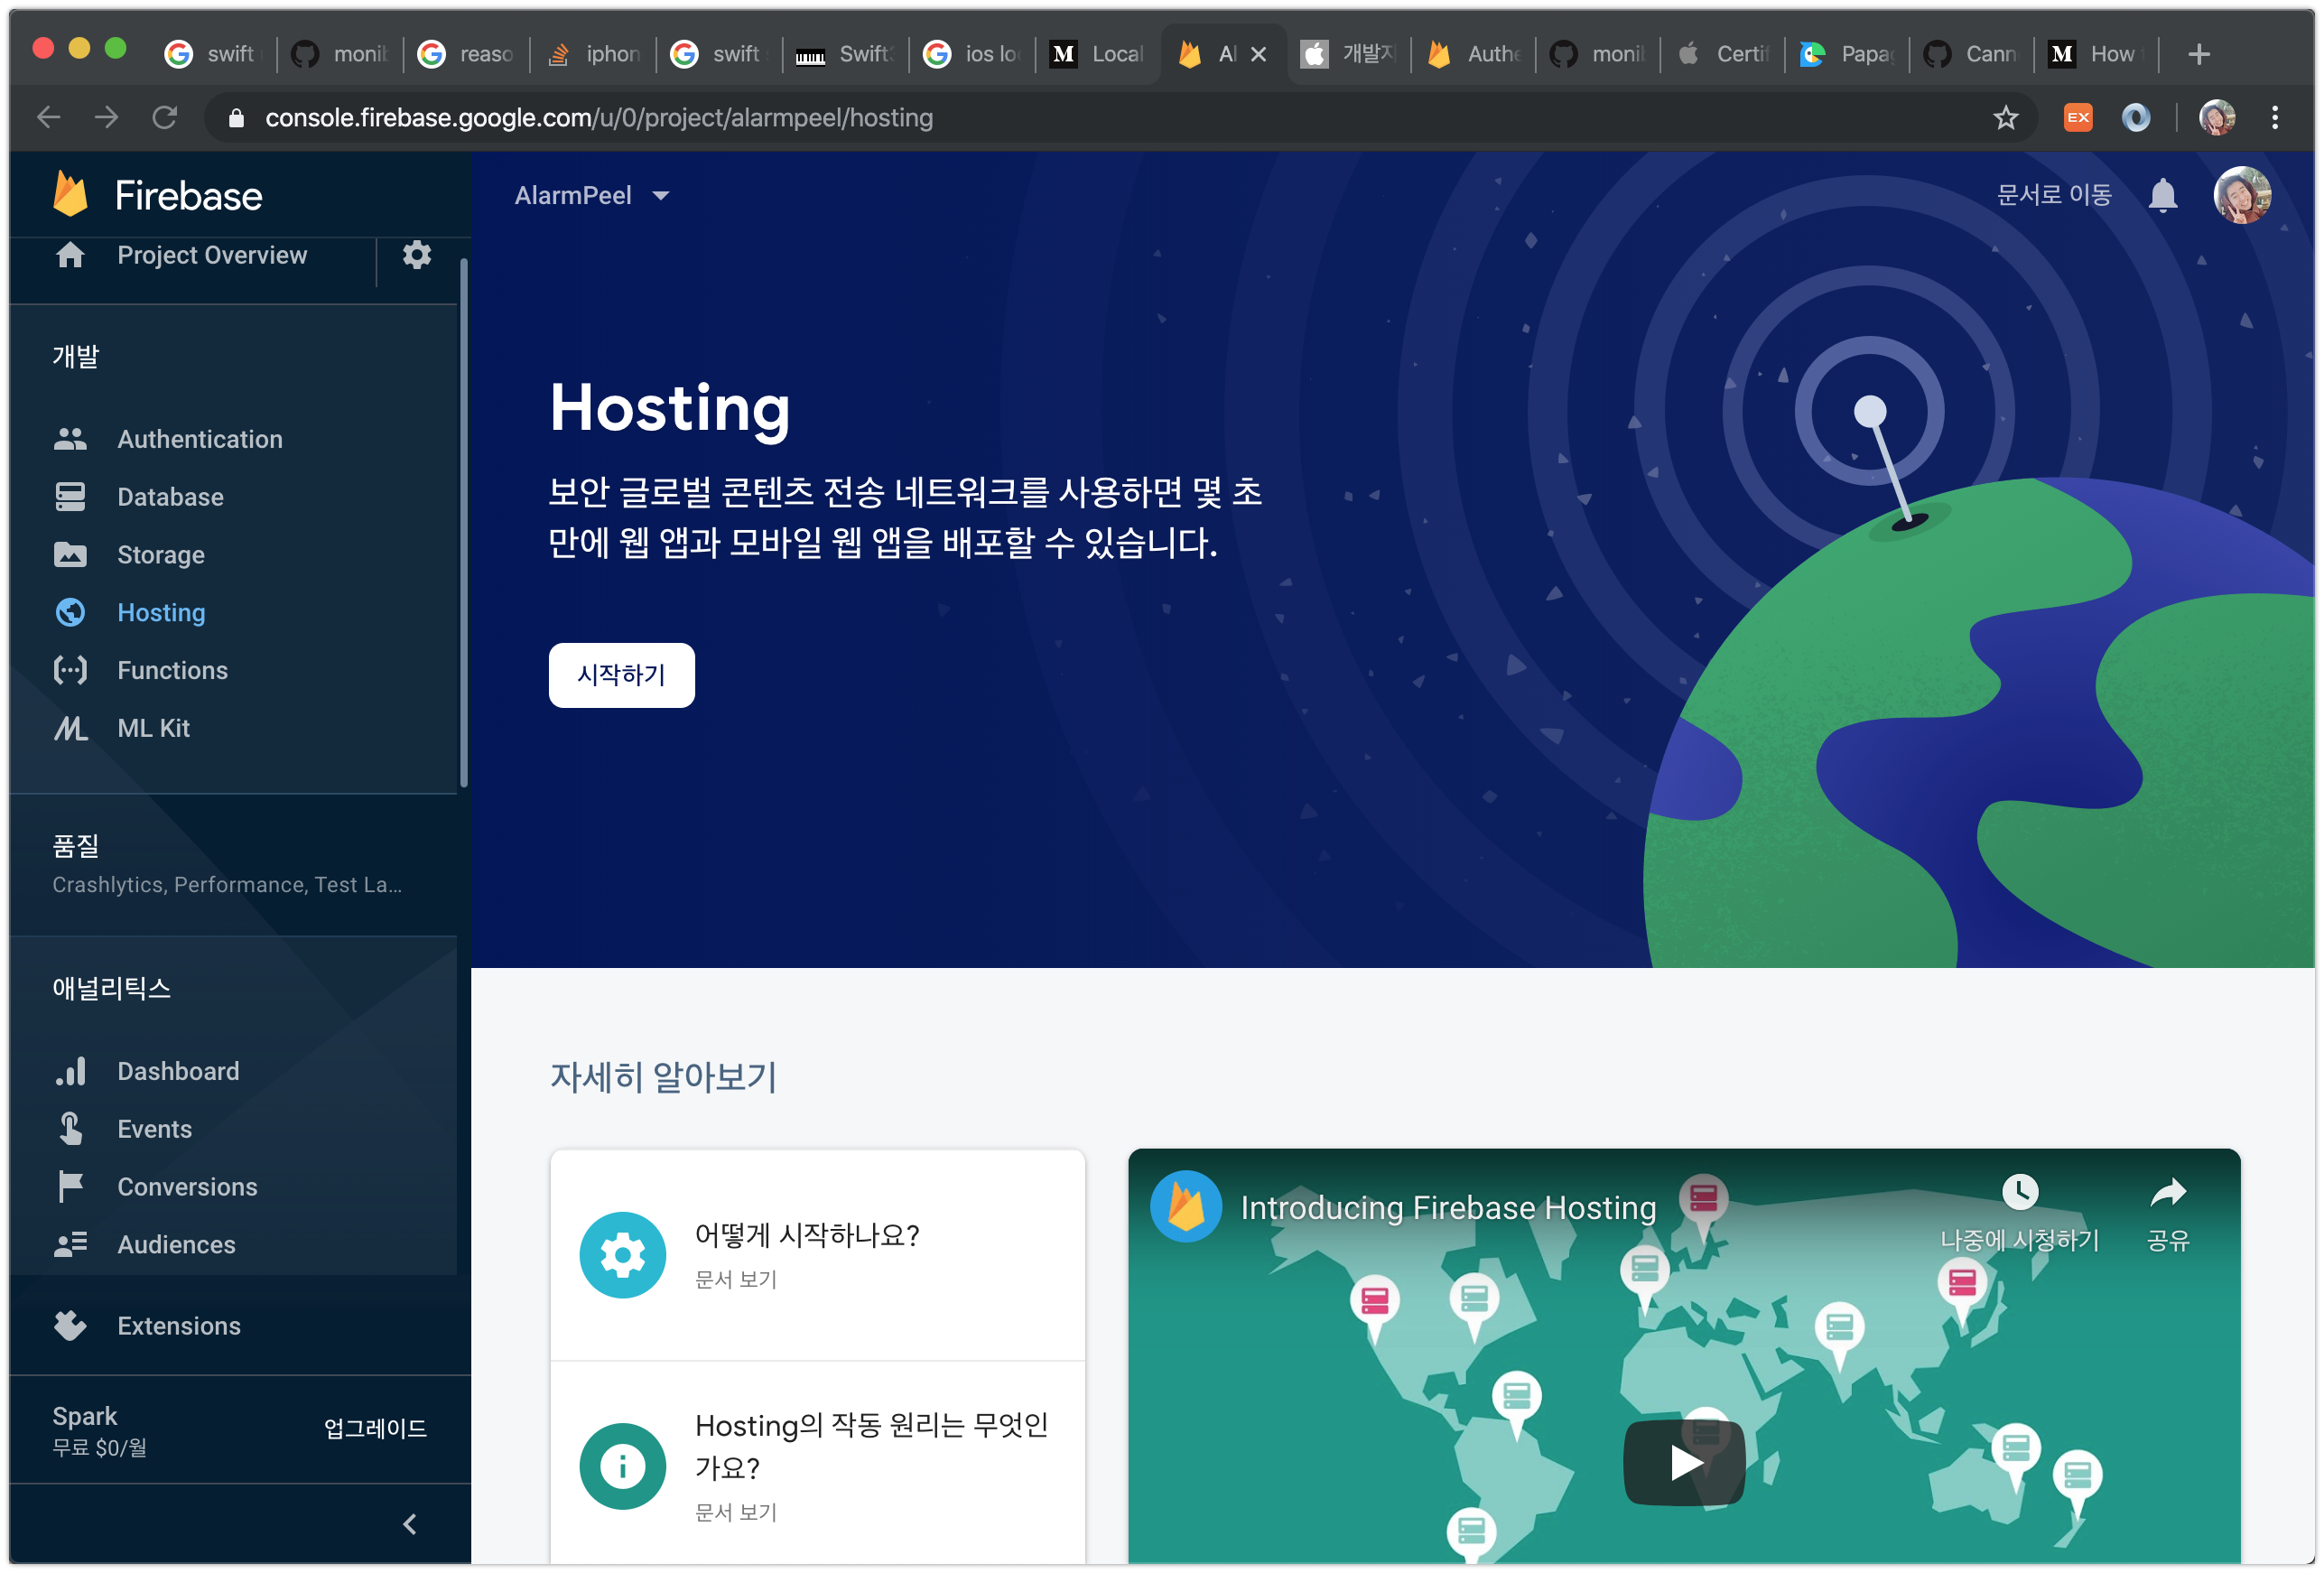
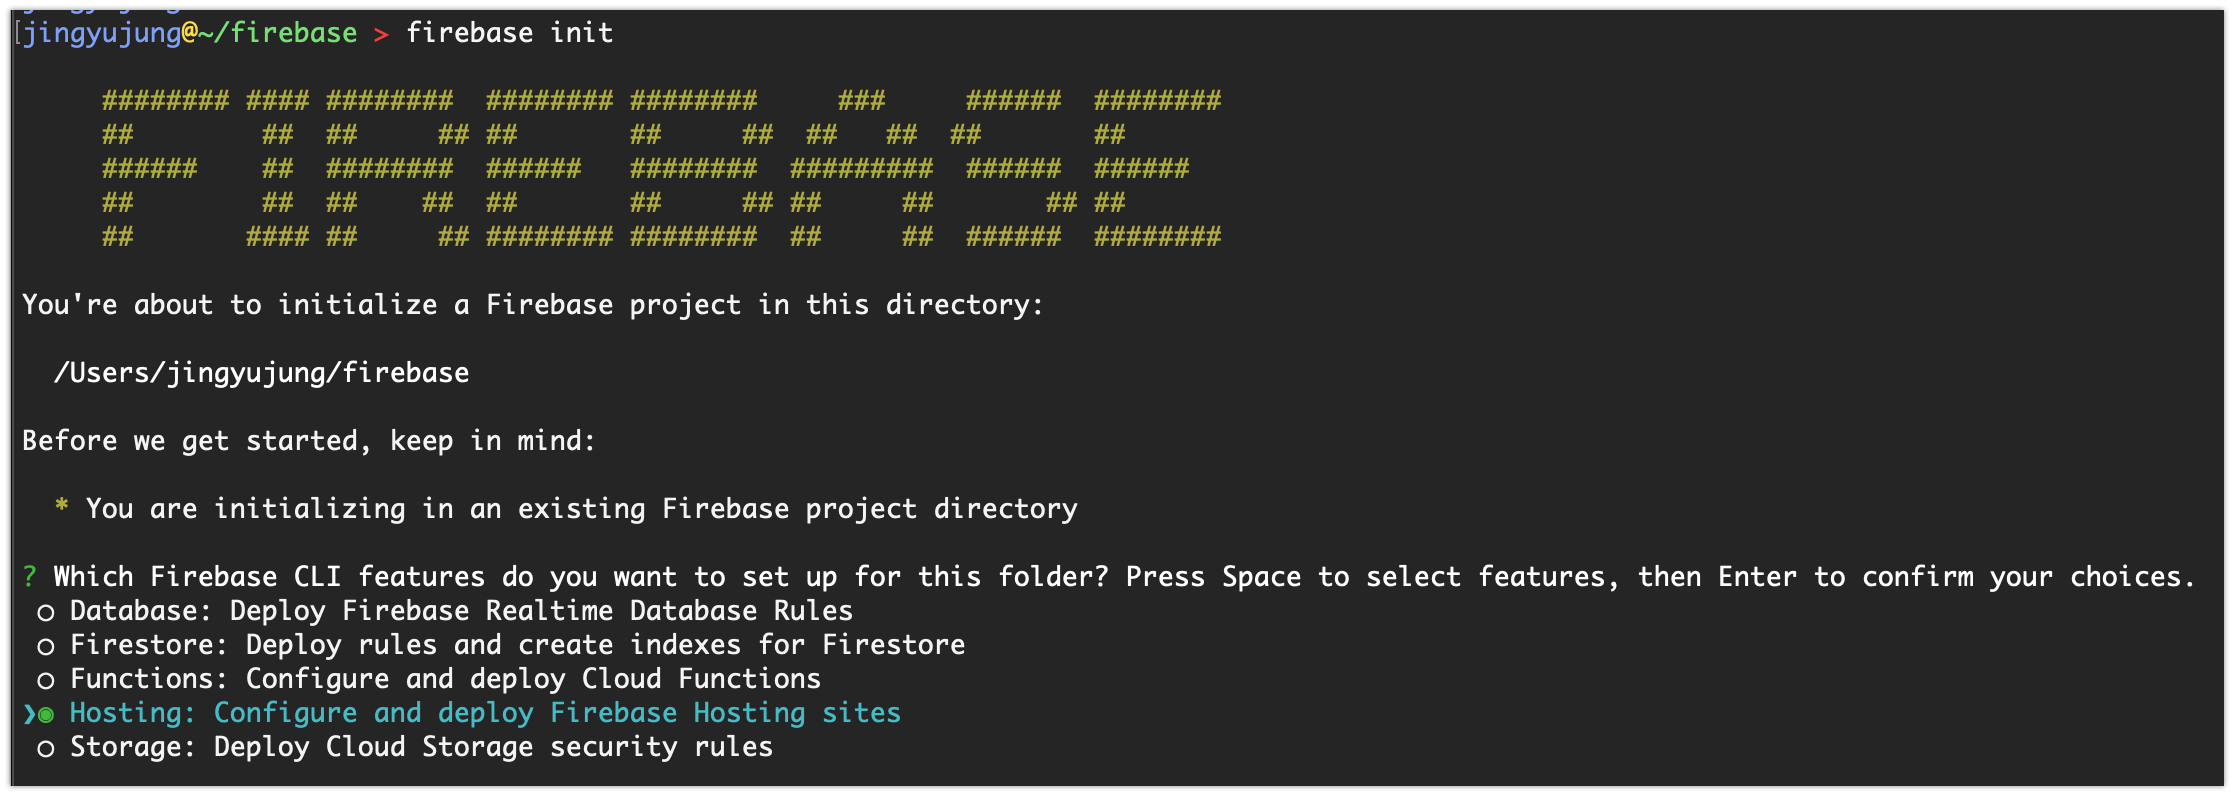
3. [Terminal] Firebase CLI 설치
Firebase Hosting에 애플 로그인에 필요한 파일을 업로드하기 위해 Firebase CLI를 이용합니다.
작업할 위치에서 아래 명령어를 입력합니다.
npm install -g firebase
npm install -g firebase-tools

firebase login
firebase init
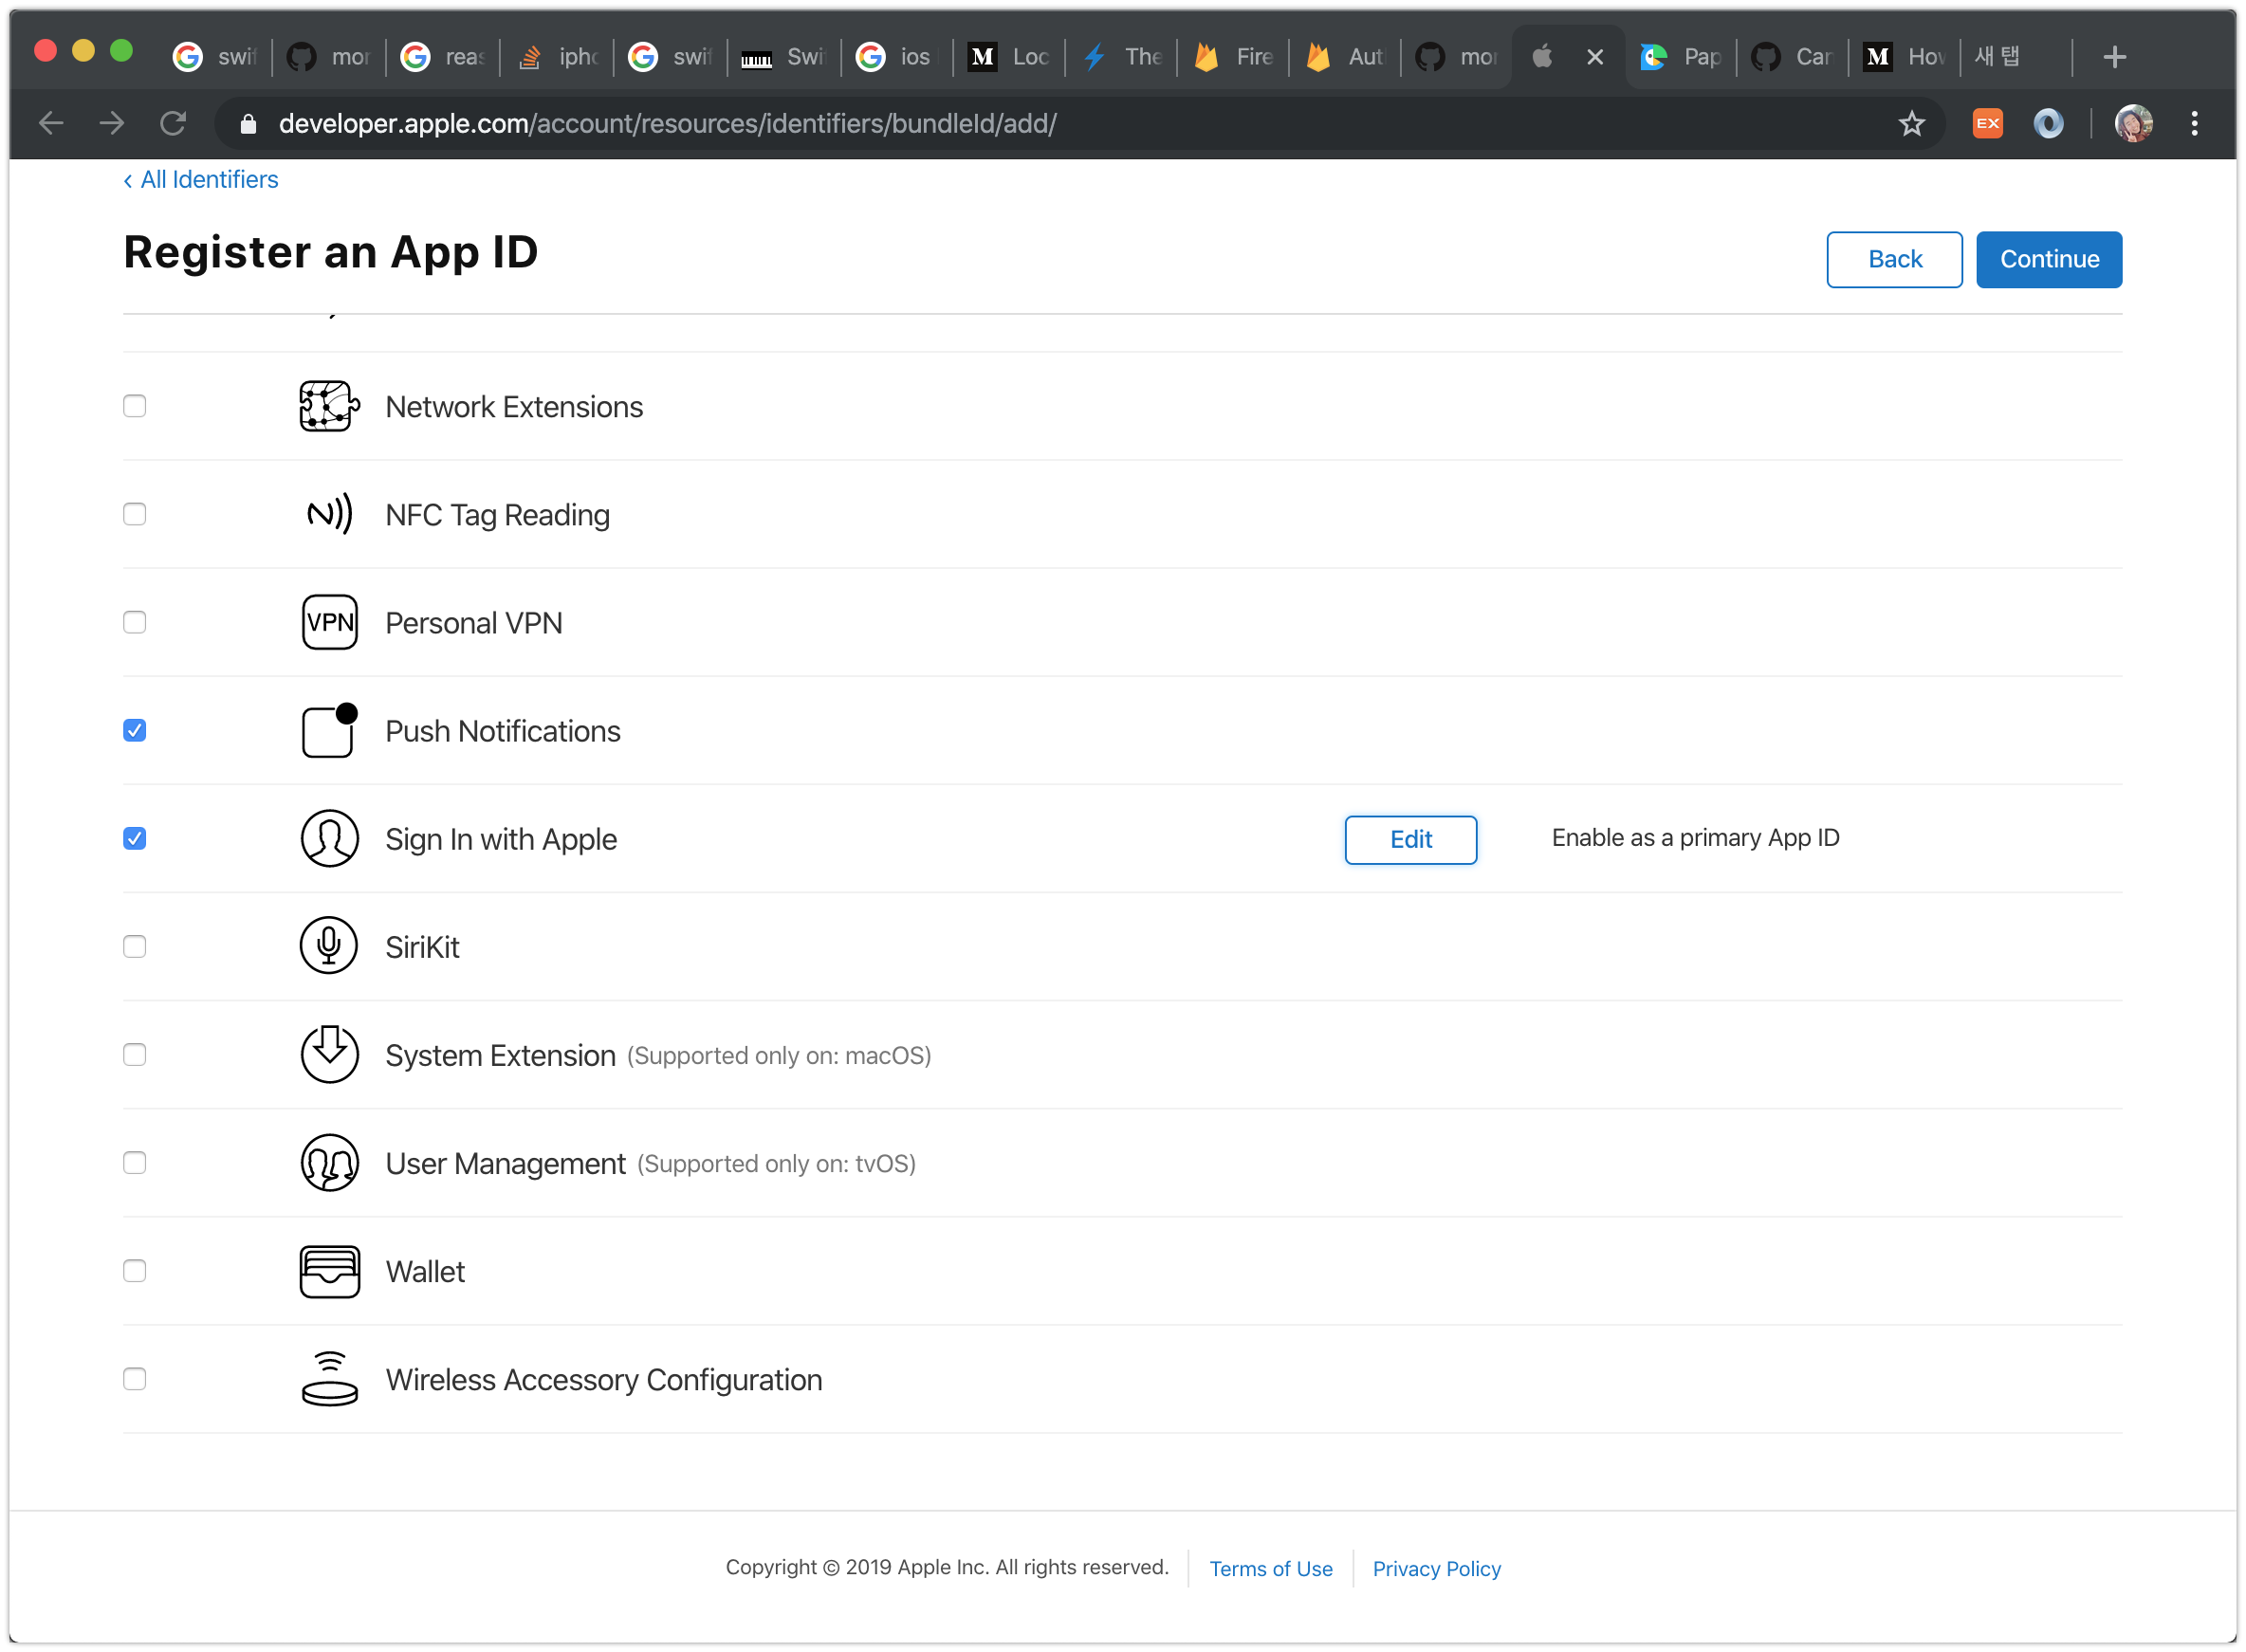
4. [Apple Developer Center] AppID 발급 과정에서 Sign in with apple 추가
AppID는 앱스토어에 등록하기 위한 App의 고유 값을 발급받는 과정입니다. 이 과정에서 앱에서 사용할 기능들을 선택합니다. 이 과정에서 Sign in with apple을 선택합니다
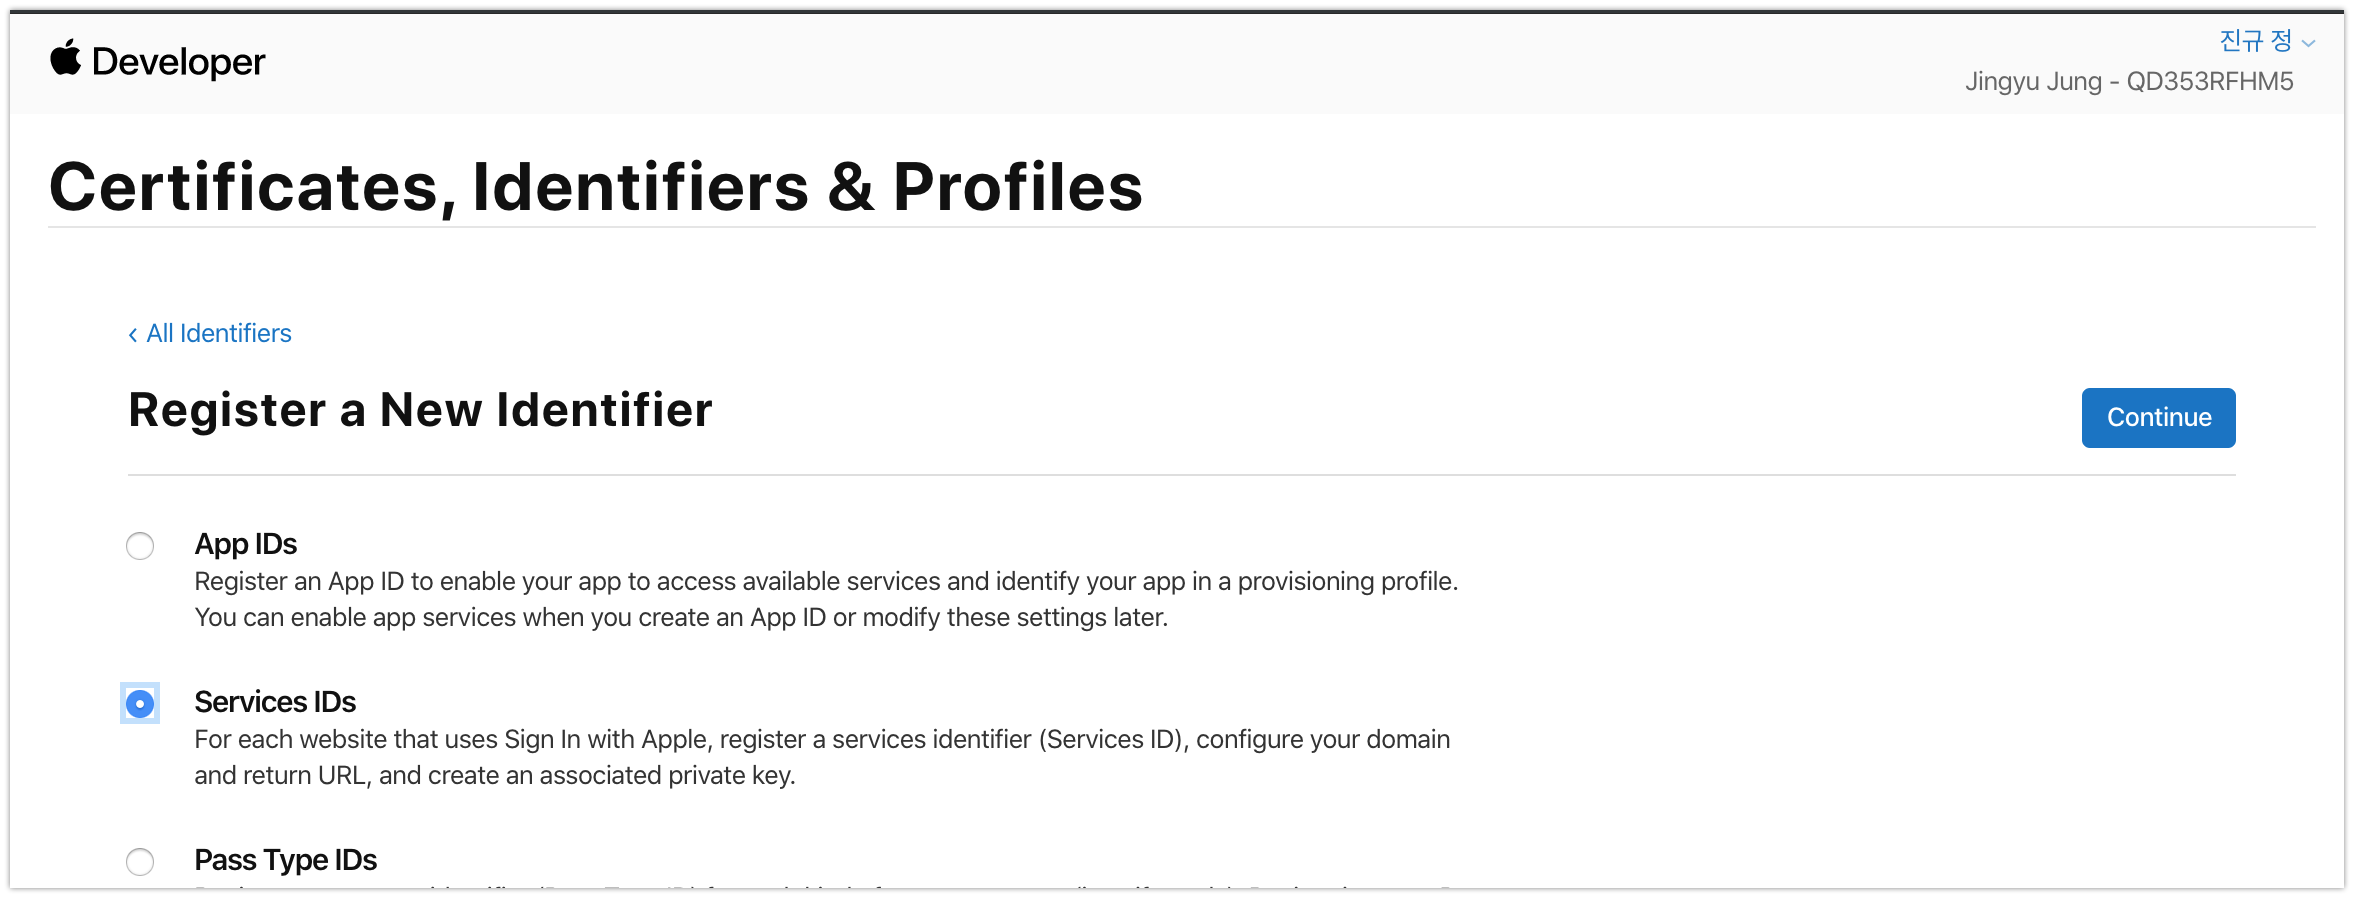
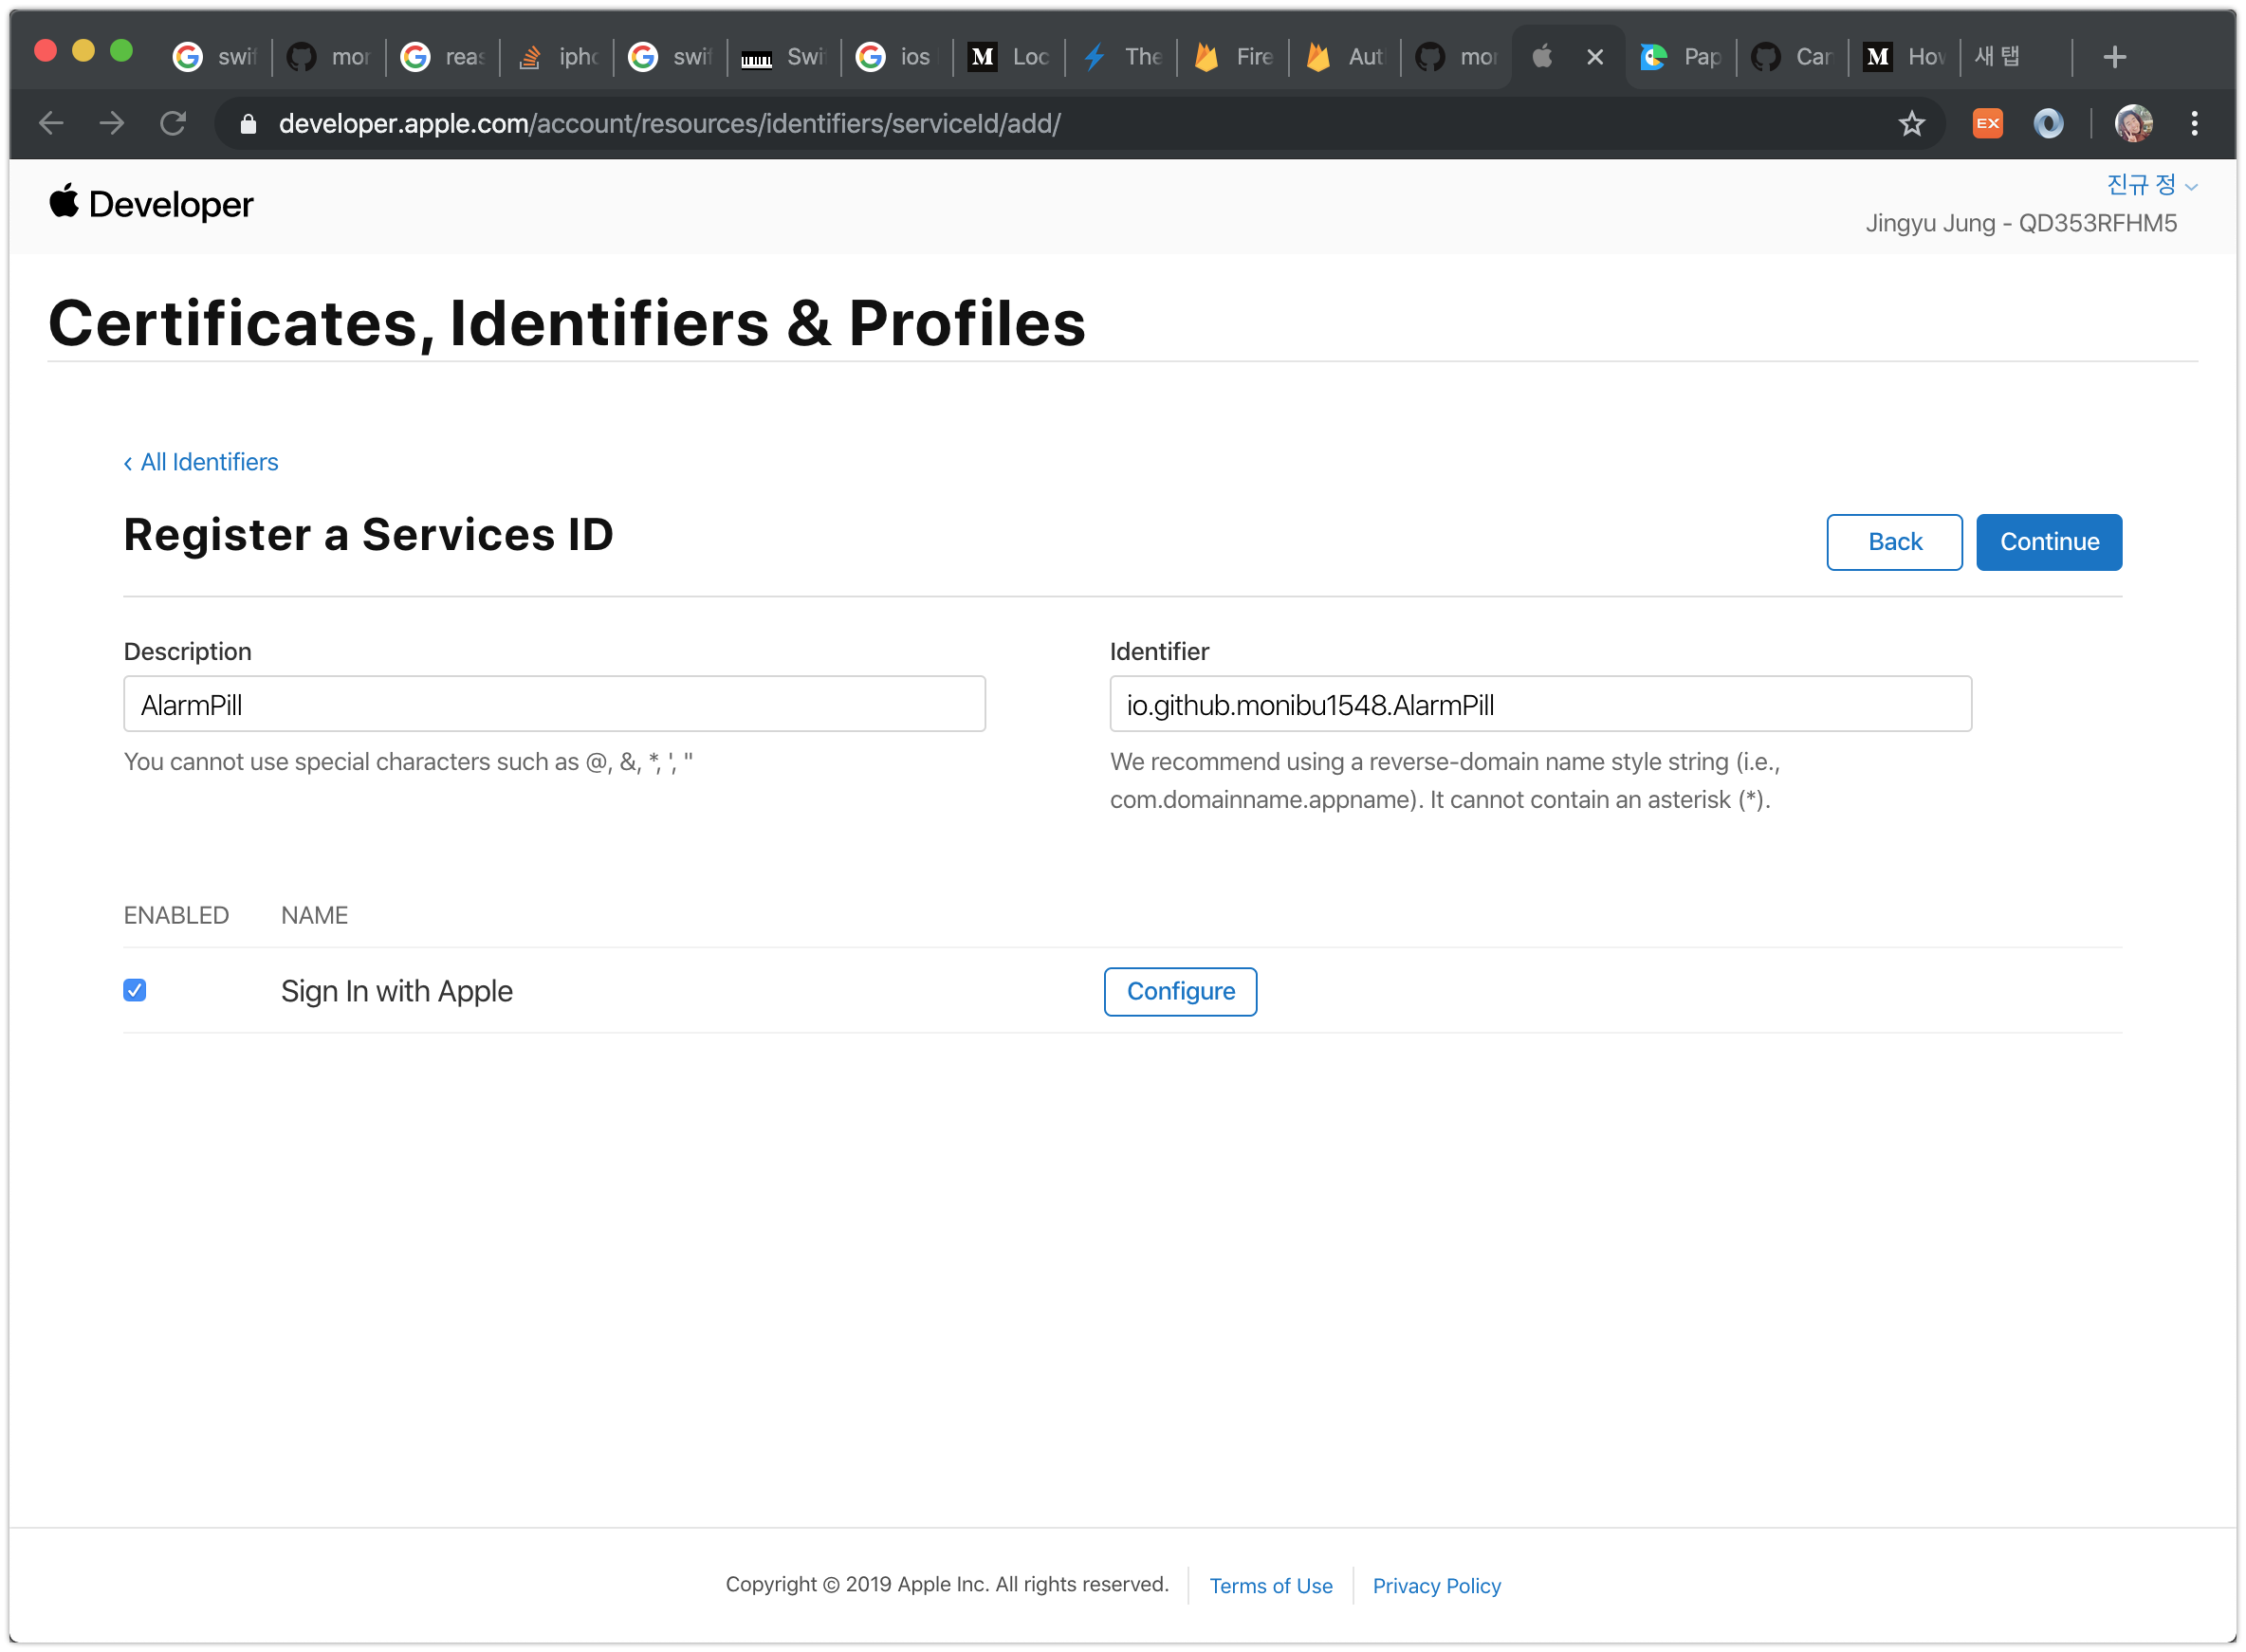
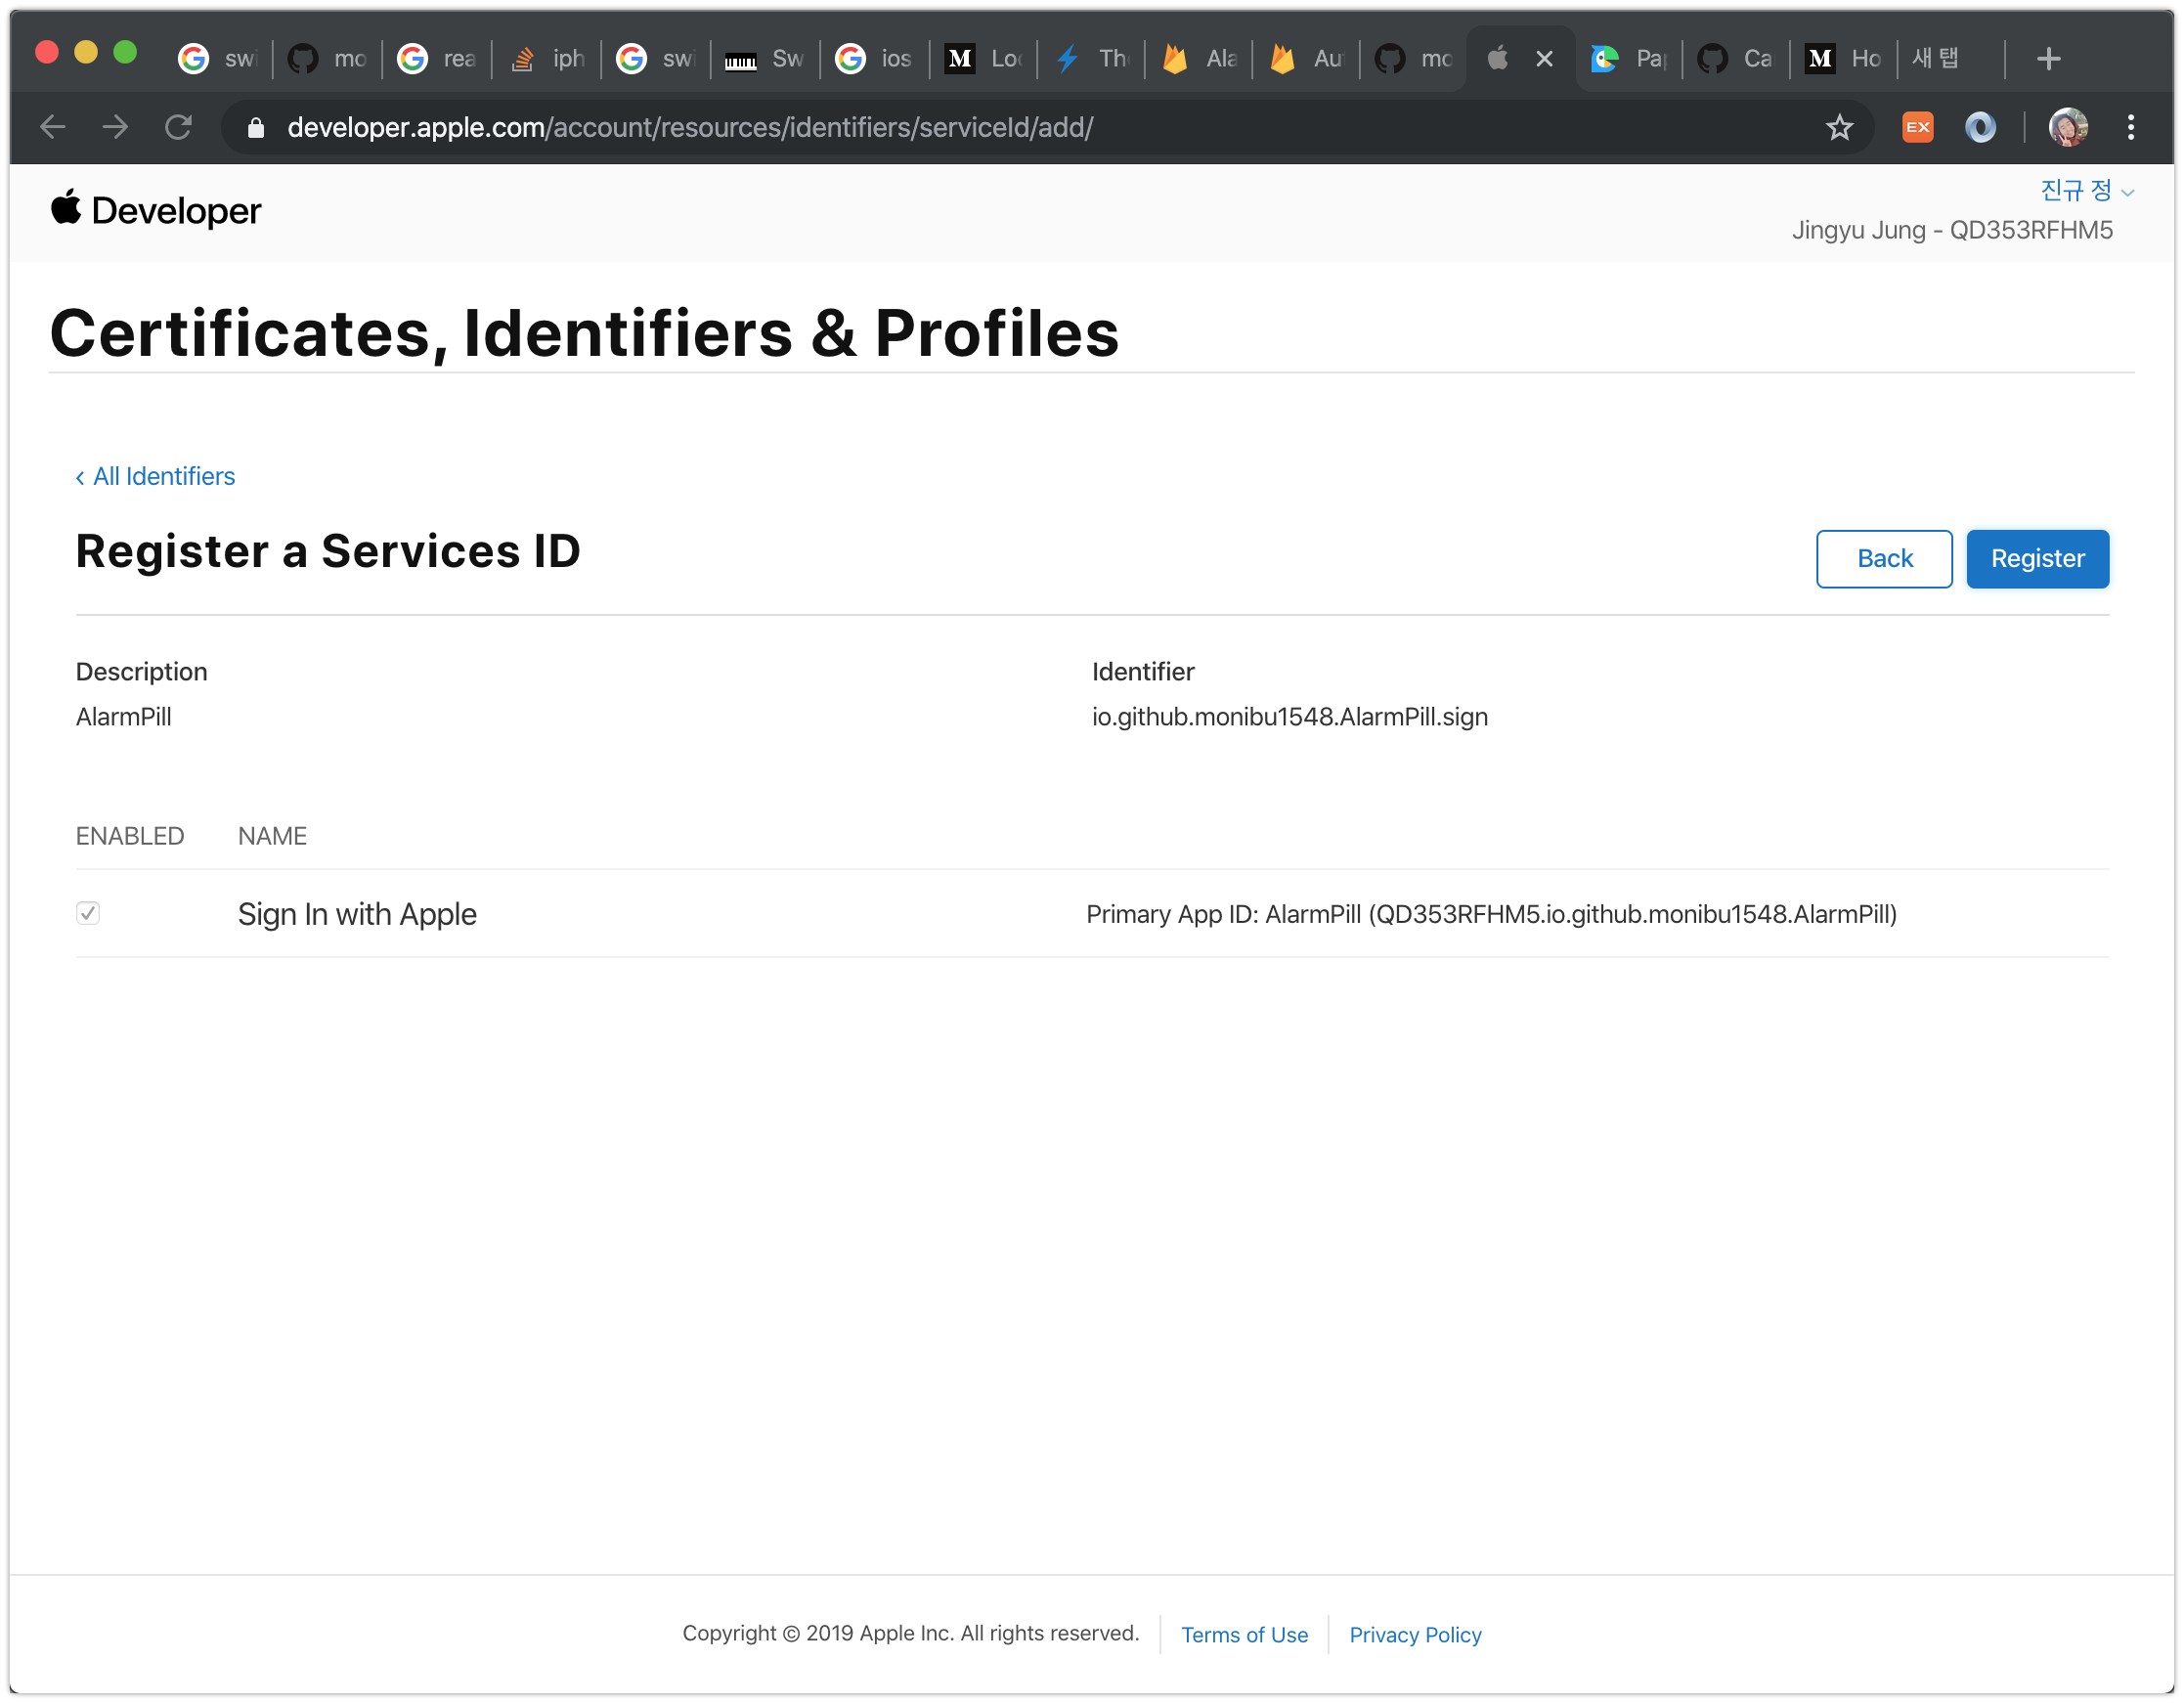
5. [Apple Developer Center] ServiceID 발급
Apple Sign은 ServiceID를 필요로 합니다. AppID와는 분리된 개념이며 앱에 추가적인 서비스를 제공할 때 필요한 ID입니다.
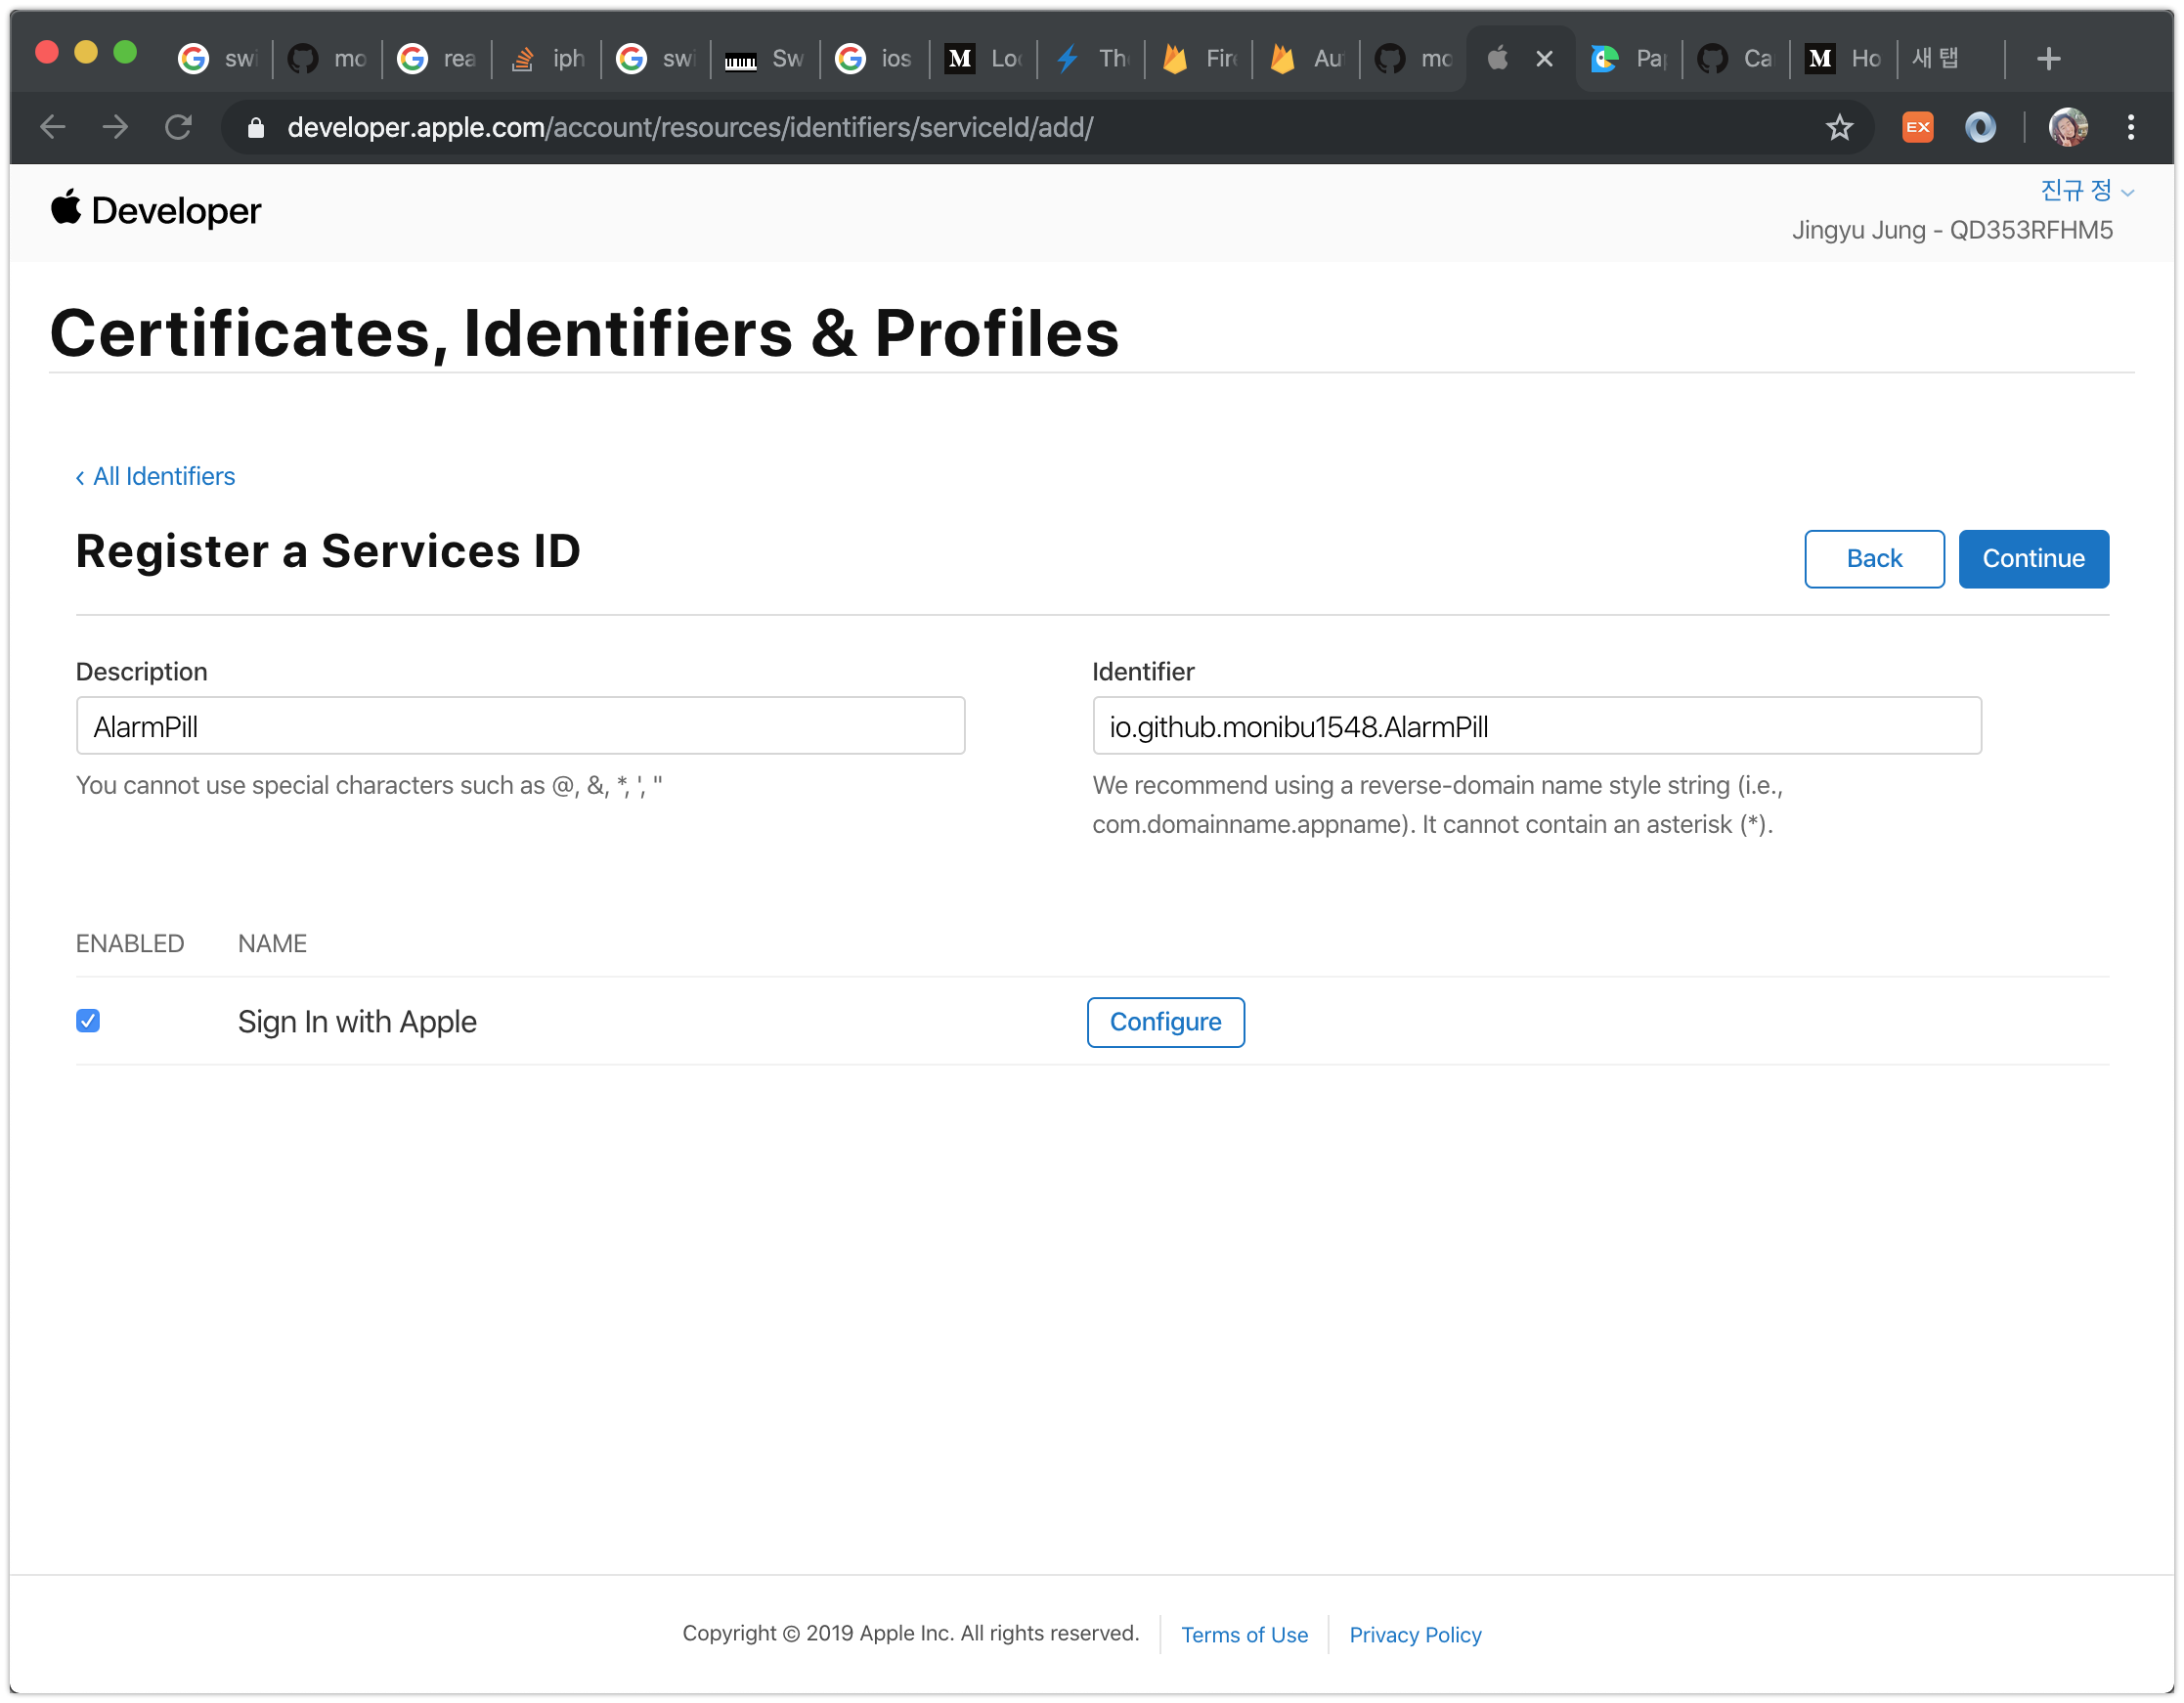
Description 에는 앱을 설명하는 문구, Bundle ID에는 앱의 bundle ID를 입력합니다.
아래 Sign In With Apple의 Enable의 체크박스를 활성화 시킵니다.
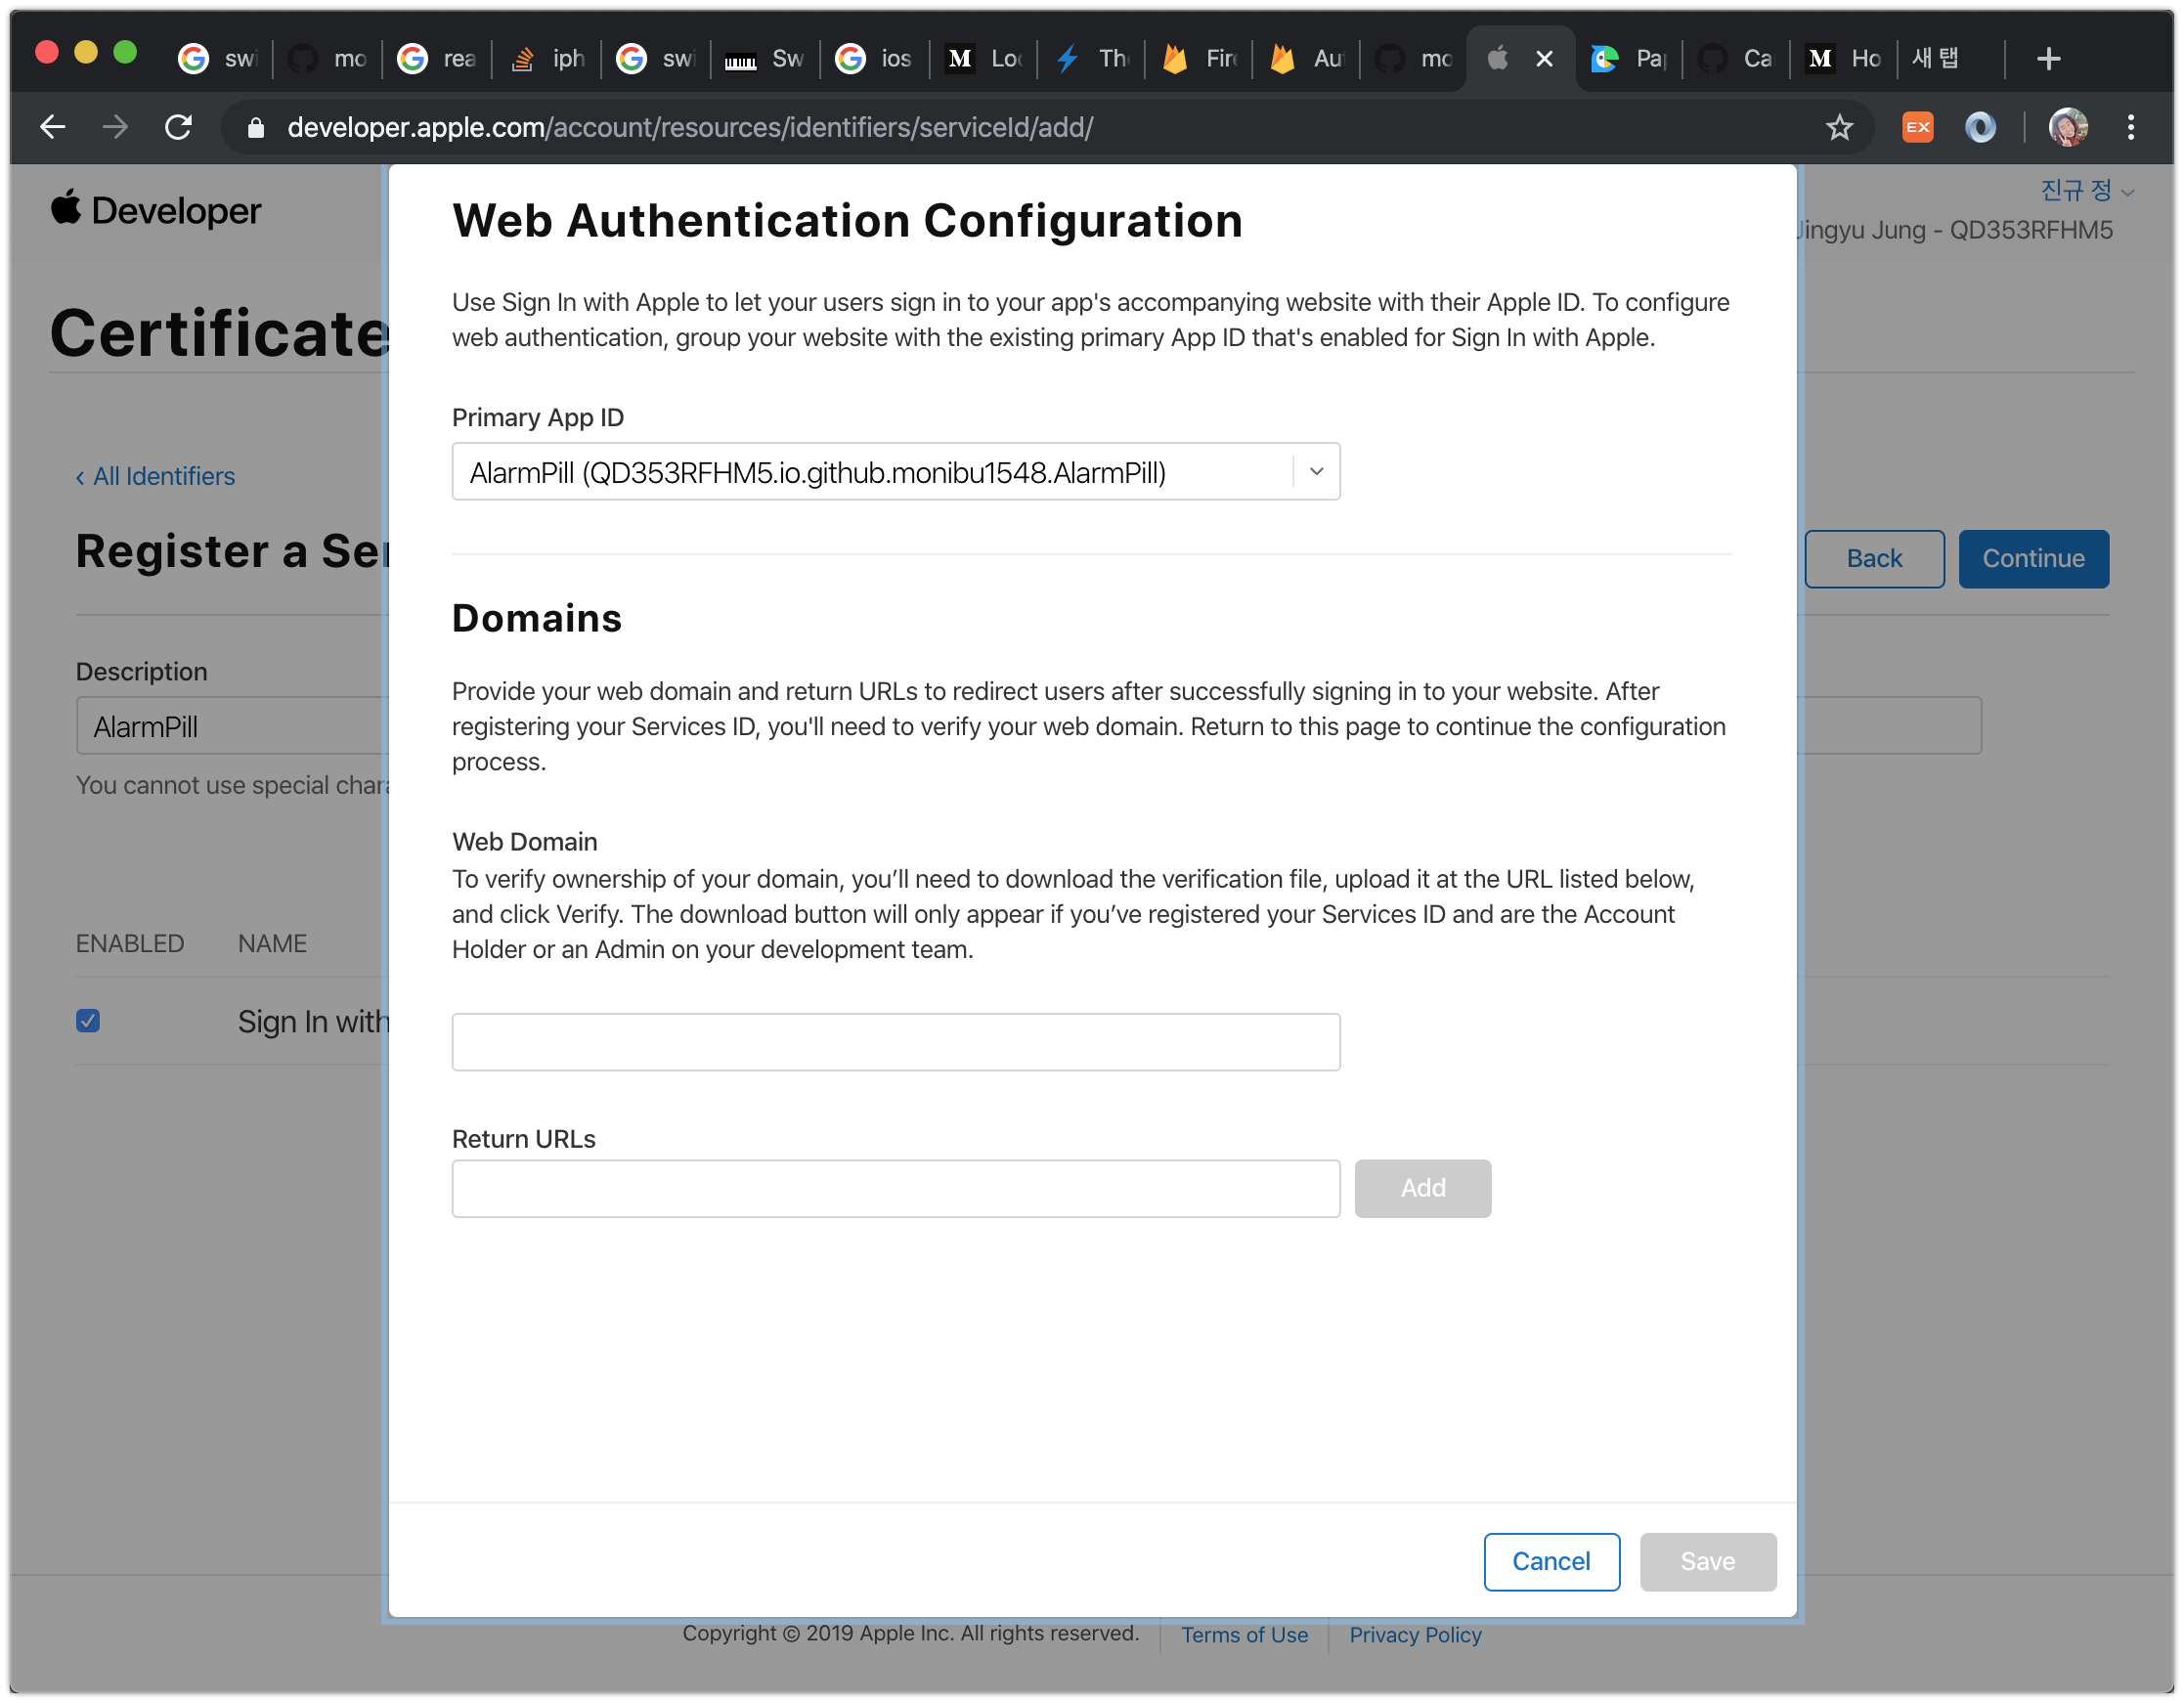
6. [Apple Developer Center] ServiceID 발급 Configure
5번의 과정에서 “Configure” 버튼을 누릅니다.
4번과정에서 생성한 AppID를 선택합니다.
Web domain 에 2번에서 설명한 {프로젝트 이름}.firebaseapp.com을 입력합니다.
Return URLs에는 1번에서 확인한 콜백URL을 입력합니다.
ServiceID가 등록되면 아래의 화면을 볼 수 있습니다.
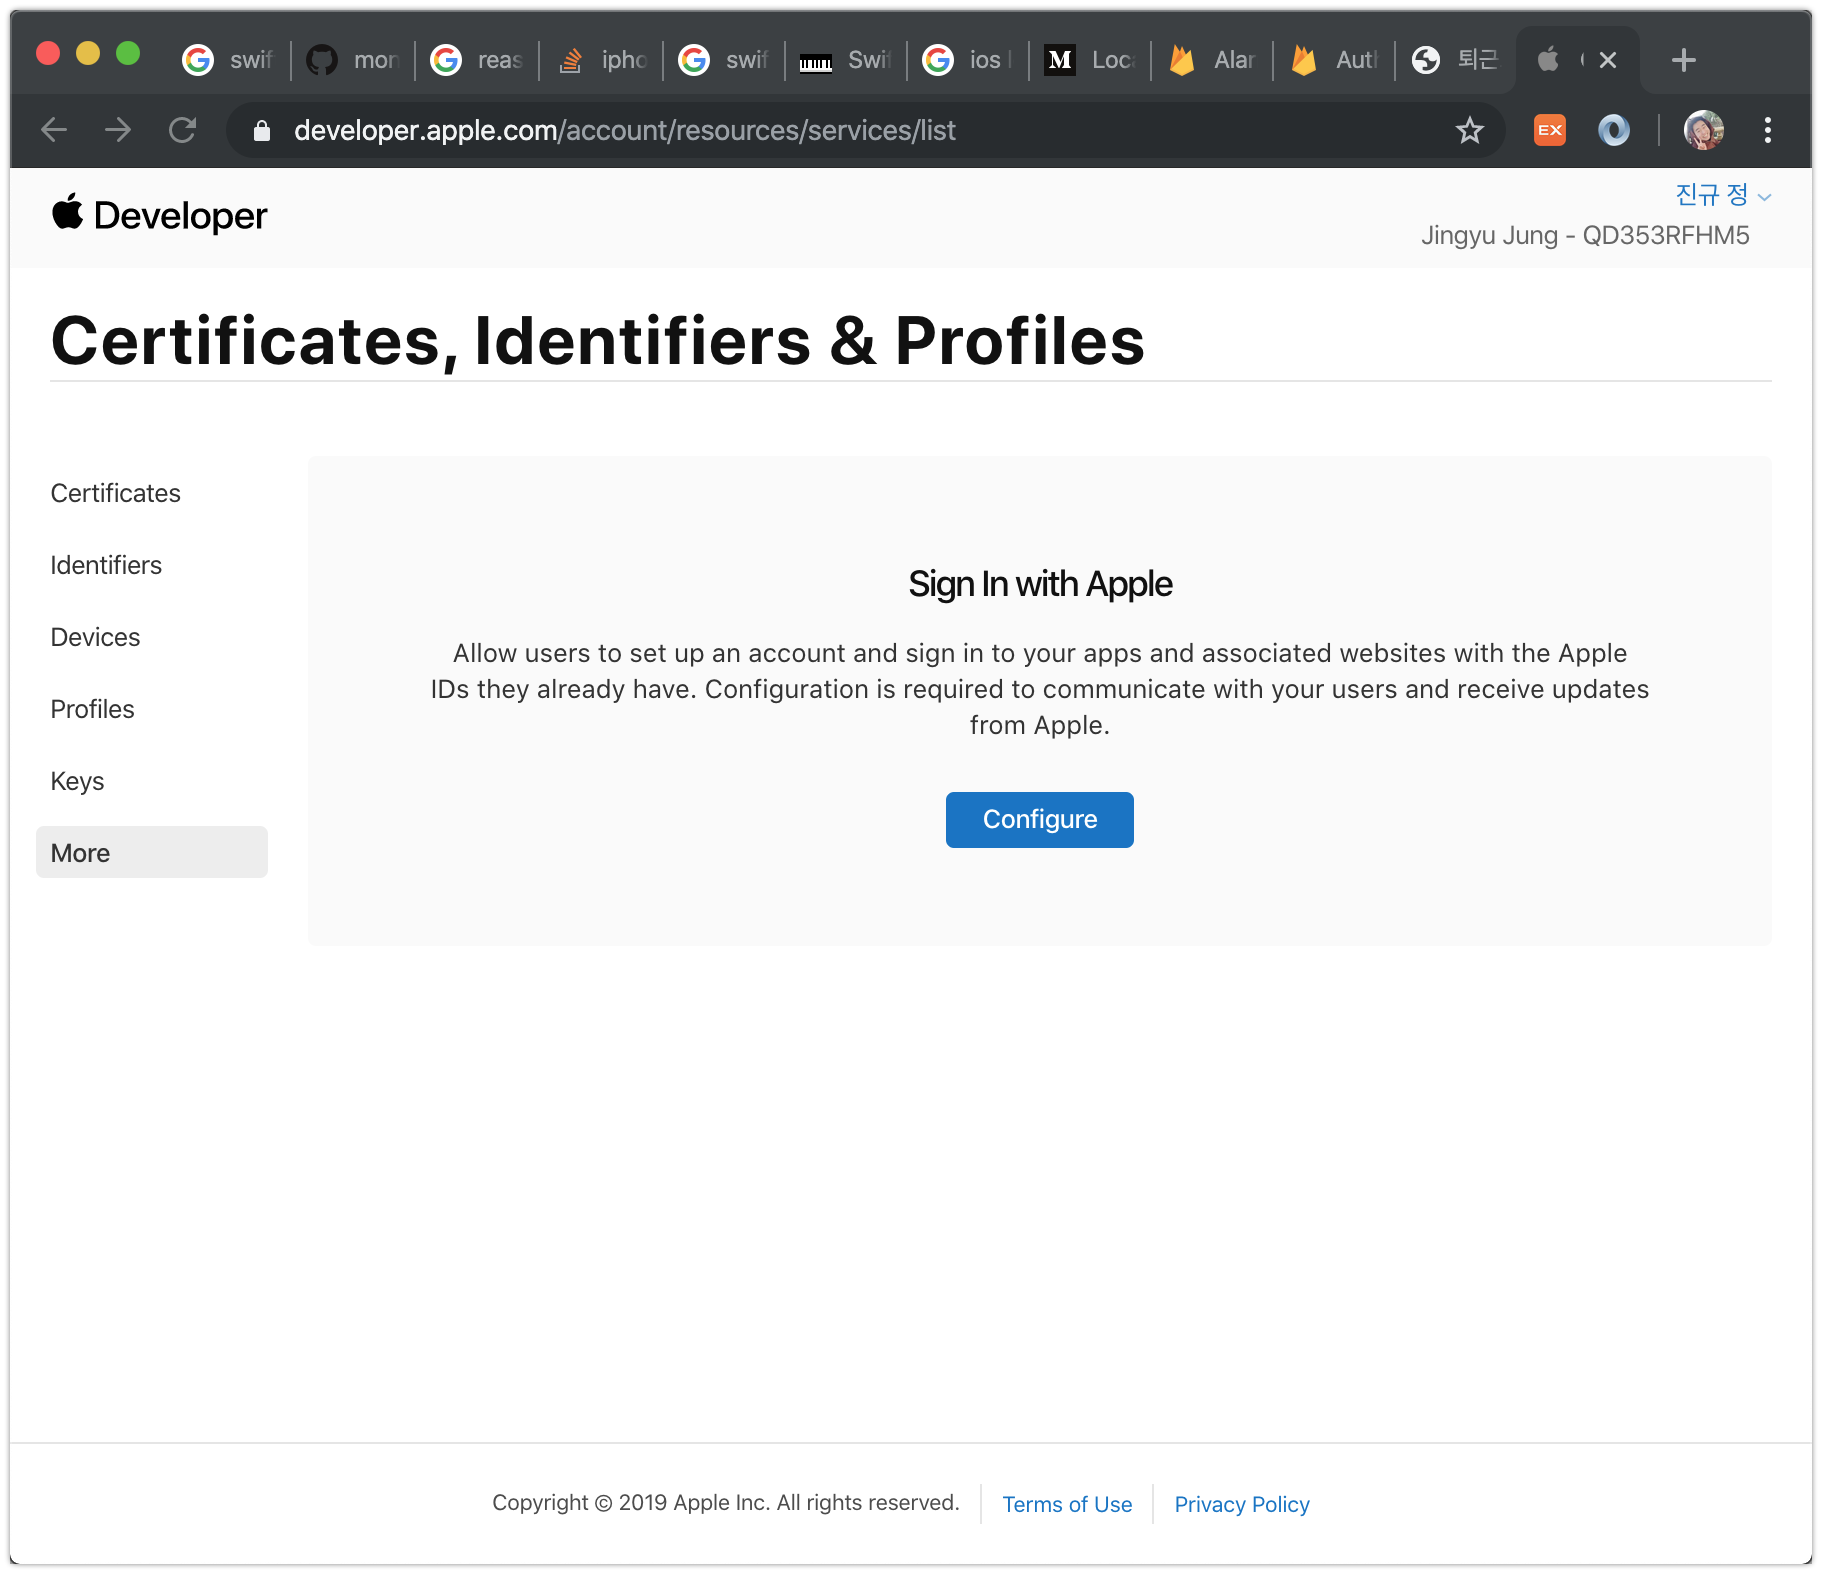
7. [Apple Developer Center] Sign In With Apple Configure 시작하기
8. [Apple Developer Center] Sign In With Apple Configure 설정하기
Domains and Associated Email Address에는 2번에서 설명한 {프로젝트 이름}.firebaseapp.com을 입력합니다.
이후 Download 버튼을 누르면 apple-developer-domain-association.txt를 다운로드 받을 수 있습니다.
이제 이 파일을 Firebase Hosting으로 배포해야합니다.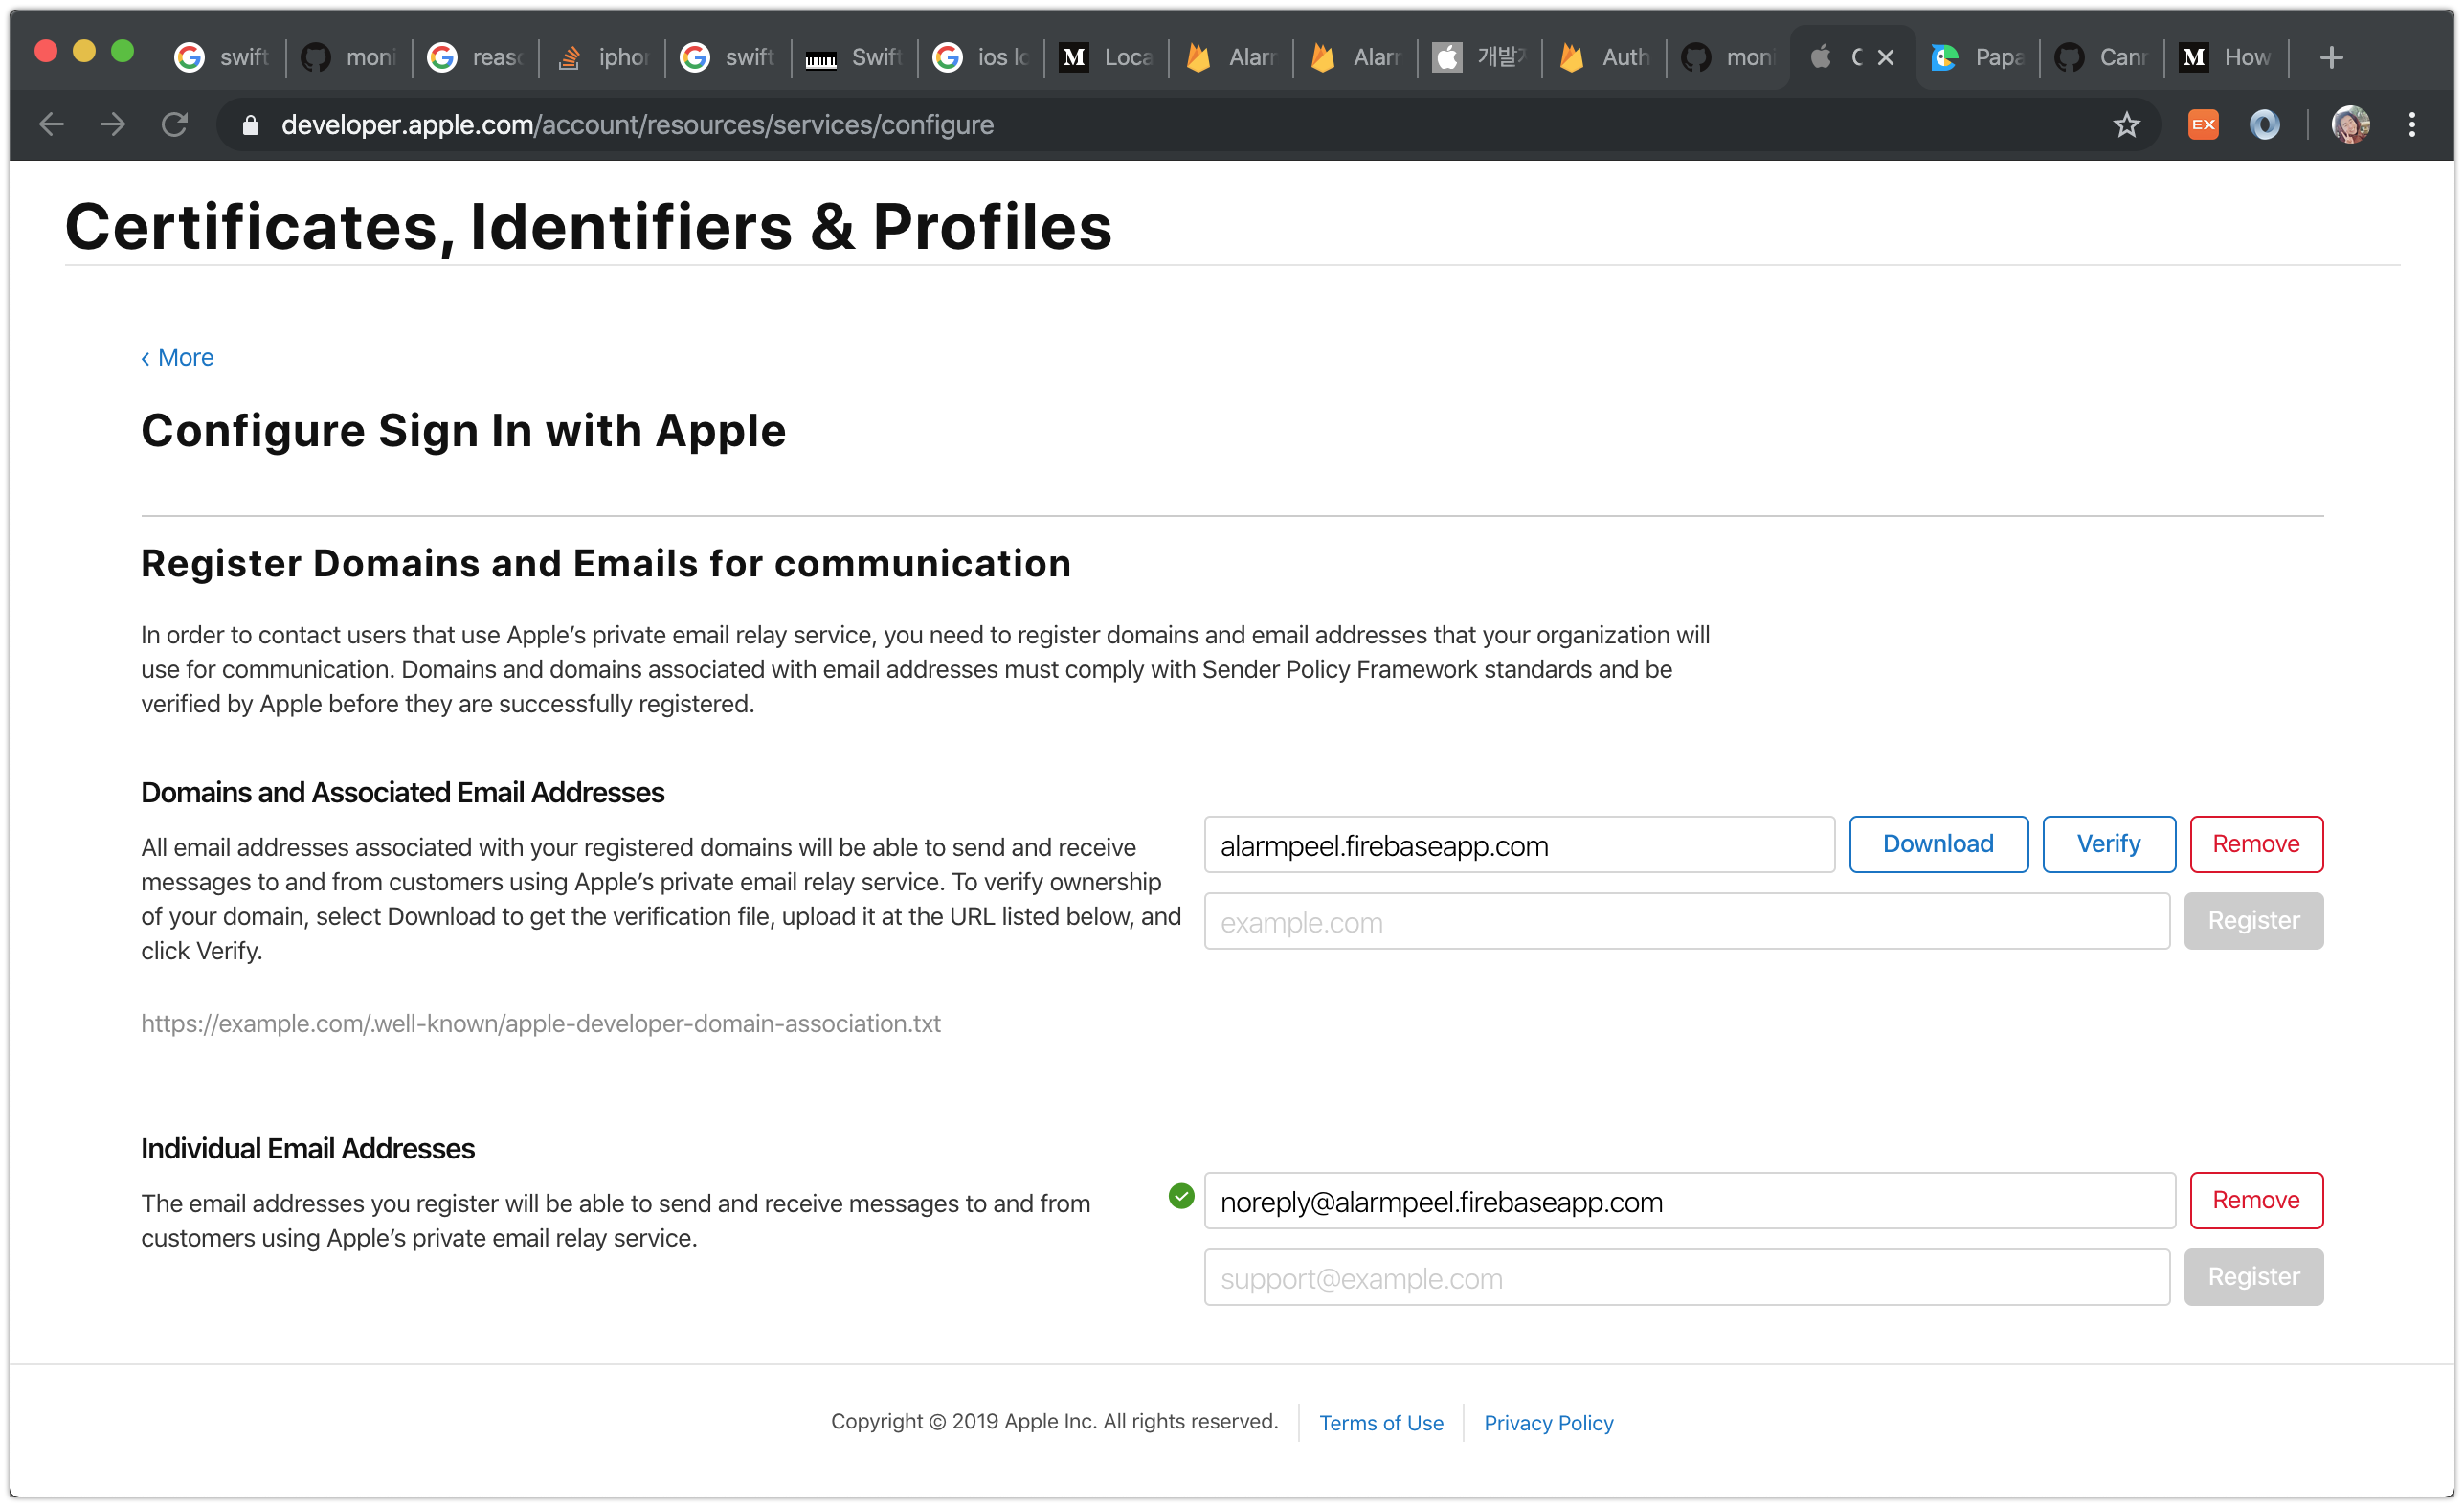
9. [Firebase Console] 애플 설정 파일 배포
8번 과정에서 내려받은 apple-developer-domain-association.txt을 Firebase Hosting을 이용해 배포합니다.
3번과정을 하고나면 ‘public’ 디렉토리가 추가된 것을 확인할 수 있습니다.public 디렉토리 하위에 .well-known 디렉토리를 추가하고 그 아래 apple-developer-domain-association.txt를 추가합니다.

그 후 아래 명령어로 파일을 배포합니다.
firebase deploy
정상적으로 배포되면 https://{프로젝트 이름}.firebaseapp.com/.well-known/apple-developer-domain-association.txt에 접근하면 Apple로 내려받은 파일을 볼 수 있습니다.
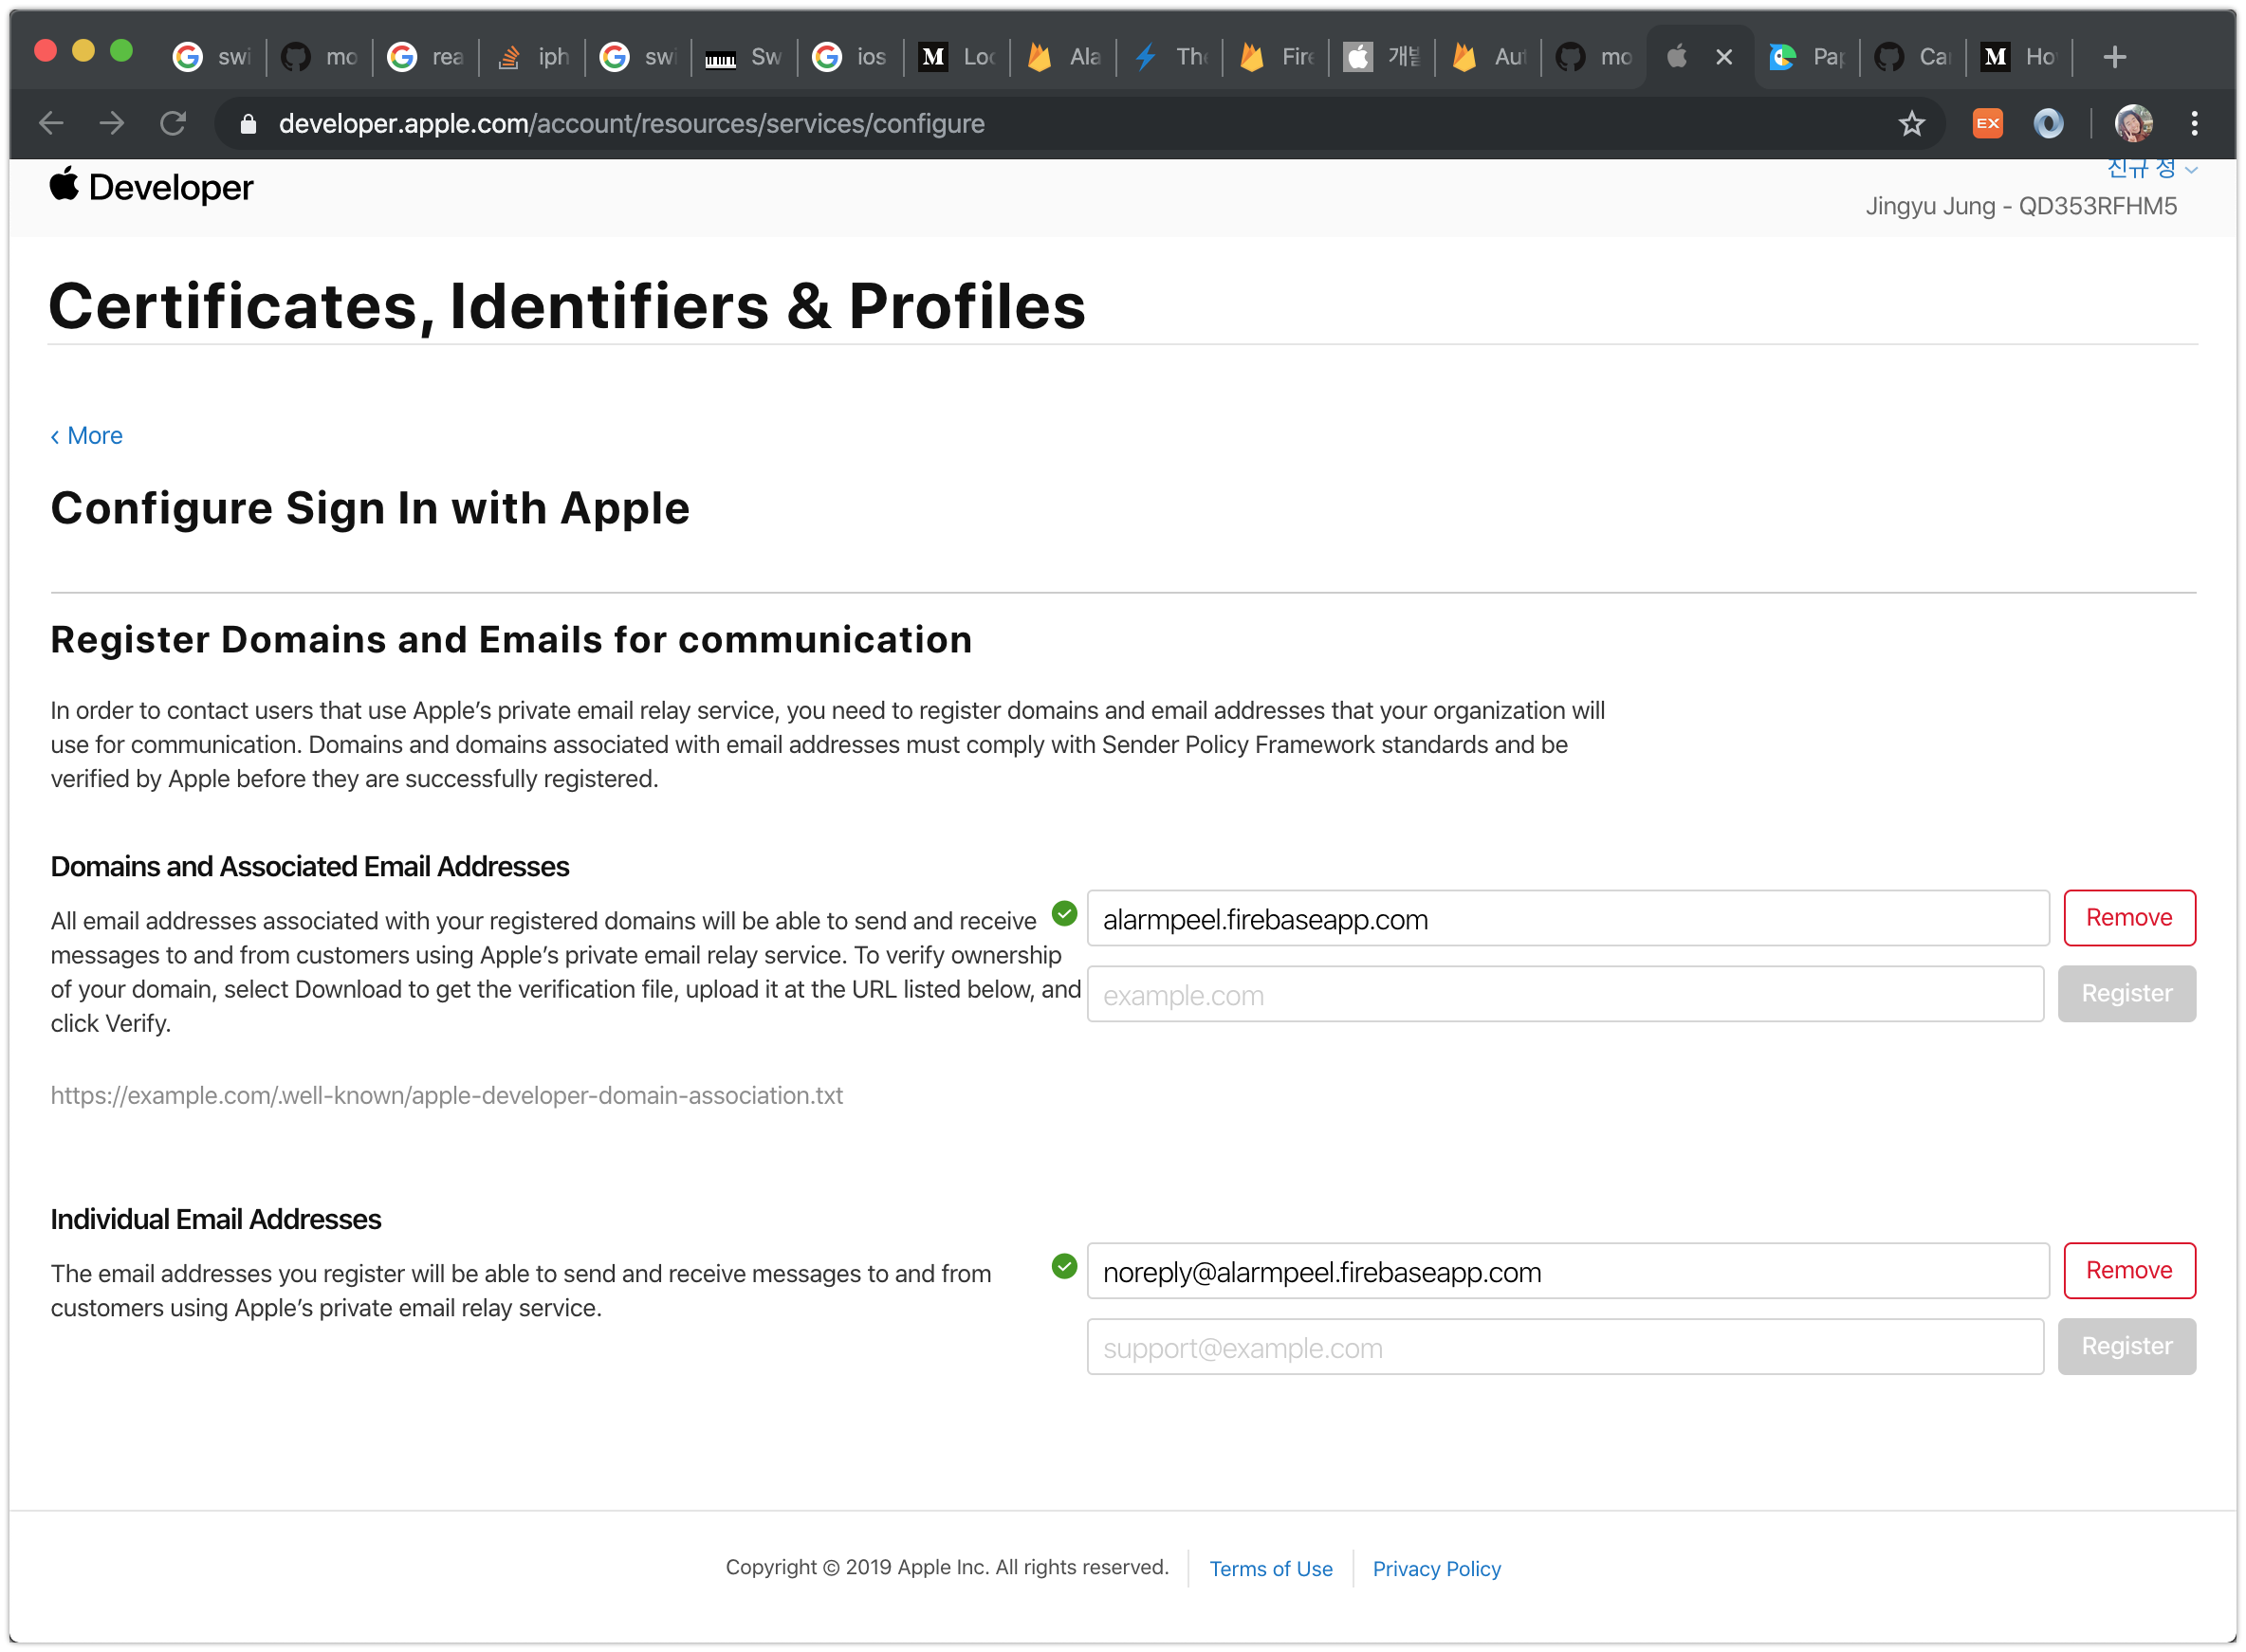
10. [Apple Developer Center] Sign In With Apple Configure Verify
다시 8번 과정으로 돌아와 Verify 버튼을 누릅니다. 만약 시간초과 에러가 발생하면 9번 과정을 다시 하고 돌아옵니다.
정상적으로 인증되면 초록 체크박스를 볼 수 있습니다.
11. [Apple Developer Center] Sign In With Apple Configure Individual Email Address
Individual Email Address 항목에는 noreply@{프로젝트 이름}.firebaseapp.com 을 입력합니다
여기까지 완료되면 세팅은 끝. 이제 구현이 남았습니다.
12. [XCode] 예제코드
쉽게 사용하기 위해 FirebaseAuthentication 클래스를 만들었습니다.
아래 예제코드에서 signInWithApple() 함수를 호출하면 끝!
//
//  FirebaseAuthentication.swift
//  AlarmPeel
//
//  Created by JingyuJung on 2019/11/18.
//  Copyright © 2019 JingyuJung. All rights reserved.
//

import Foundation
import AuthenticationServices
import FirebaseAuth
import CommonCrypto

enum FirebaseAuthenticationNotification: String {
    case signOutSuccess
    case signOutError
    case signInSuccess
    case signInError

    var notificationName: NSNotification.Name {
        return NSNotification.Name(rawValue: self.rawValue)
    }
}

class FirebaseAuthentication: NSObject {
    static let shared = FirebaseAuthentication()

    var window: UIWindow?
    fileprivate var currentNonce: String?

    private override init() {}

    func signInWithApple(window: UIWindow) {
      self.window = window
      let nonce = randomNonceString()
        currentNonce = nonce
      let appleIDProvider = ASAuthorizationAppleIDProvider()
      let request = appleIDProvider.createRequest()
      request.requestedScopes = [.fullName, .email]
      request.nonce = sha256(nonce)

      let authorizationController = ASAuthorizationController(authorizationRequests: [request])
      authorizationController.delegate = self
      authorizationController.presentationContextProvider = self
      authorizationController.performRequests()
    }

    func signInWithAnonymous() {
        Auth.auth().signInAnonymously() { [weak self] (authResult, error) in
            if error != nil {
                self?.postNotificationSignInError()
                return
            }
            self?.postNotificationSignInSuccess()
        }
    }

    func signOut() {
        let firebaseAuth = Auth.auth()
        do {
            try firebaseAuth.signOut()
            postNotificationSignOutSuccess()
        } catch let error {
            postNotificationSignOutError()
        }
    }
}

extension FirebaseAuthentication: ASAuthorizationControllerDelegate {
    func authorizationController(controller: ASAuthorizationController, didCompleteWithAuthorization authorization: ASAuthorization) {
      if let appleIDCredential = authorization.credential as? ASAuthorizationAppleIDCredential {
        guard let nonce = currentNonce else {
          fatalError("Invalid state: A login callback was received, but no login request was sent.")
        }
        guard let appleIDToken = appleIDCredential.identityToken else {
          print("Unable to fetch identity token")
          return
        }
        guard let idTokenString = String(data: appleIDToken, encoding: .utf8) else {
          print("Unable to serialize token string from data: \(appleIDToken.debugDescription)")
          return
        }
        // Initialize a Firebase credential.
        let credential = OAuthProvider.credential(withProviderID: "apple.com",
                                                  idToken: idTokenString,
                                                  rawNonce: nonce)
        // Sign in with Firebase.
        Auth.auth().signIn(with: credential) { [weak self] (authResult, error) in
            if (error != nil) {
                self?.postNotificationSignInError()
            return
          }
            self?.postNotificationSignInSuccess()
        }
      }
    }

    func authorizationController(controller: ASAuthorizationController, didCompleteWithError error: Error) {
      // Handle error.
      print("Sign in with Apple errored: \(error)")
    }
}

extension FirebaseAuthentication: ASAuthorizationControllerPresentationContextProviding {
    func presentationAnchor(for controller: ASAuthorizationController) -> ASPresentationAnchor {
        return window ?? UIWindow()
    }
}

extension FirebaseAuthentication {
    private func randomNonceString(length: Int = 32) -> String {
      precondition(length > 0)
      let charset: Array<Character> =
          Array("0123456789ABCDEFGHIJKLMNOPQRSTUVXYZabcdefghijklmnopqrstuvwxyz-._")
      var result = ""
      var remainingLength = length

      while remainingLength > 0 {
        let randoms: [UInt8] = (0 ..< 16).map { _ in
          var random: UInt8 = 0
          let errorCode = SecRandomCopyBytes(kSecRandomDefault, 1, &random)
          if errorCode != errSecSuccess {
            fatalError("Unable to generate nonce. SecRandomCopyBytes failed with OSStatus \(errorCode)")
          }
          return random
        }

        randoms.forEach { random in
          if length == 0 {
            return
          }

          if random < charset.count {
            result.append(charset[Int(random)])
            remainingLength -= 1
          }
        }
      }

      return result
    }

    private func sha256(_ input: String) -> String {
      let inputData = Data(input.utf8)
      let hashedData = hashSHA256(data: inputData)
      let hashString = hashedData!.compactMap {
        return String(format: "%02x", $0)
      }.joined()

      return hashString
    }

    private func hashSHA256(data:Data) -> Data? {
        var hashData = Data(count: Int(CC_SHA256_DIGEST_LENGTH))

        _ = hashData.withUnsafeMutableBytes {digestBytes in
            data.withUnsafeBytes {messageBytes in
                CC_SHA256(messageBytes, CC_LONG(data.count), digestBytes)
            }
        }
        return hashData
    }

    private func postNotificationSignInSuccess() {
        NotificationCenter.default.post(name: FirebaseAuthenticationNotification.signInSuccess.notificationName, object: nil)
    }

    private func postNotificationSignInError() {
        NotificationCenter.default.post(name: FirebaseAuthenticationNotification.signInError.notificationName, object: nil)
    }

    private func postNotificationSignOutSuccess() {
        NotificationCenter.default.post(name: FirebaseAuthenticationNotification.signOutSuccess.notificationName, object: nil)
    }

    private func postNotificationSignOutError() {
        NotificationCenter.default.post(name: FirebaseAuthenticationNotification.signOutError.notificationName, object: nil)
    }
}
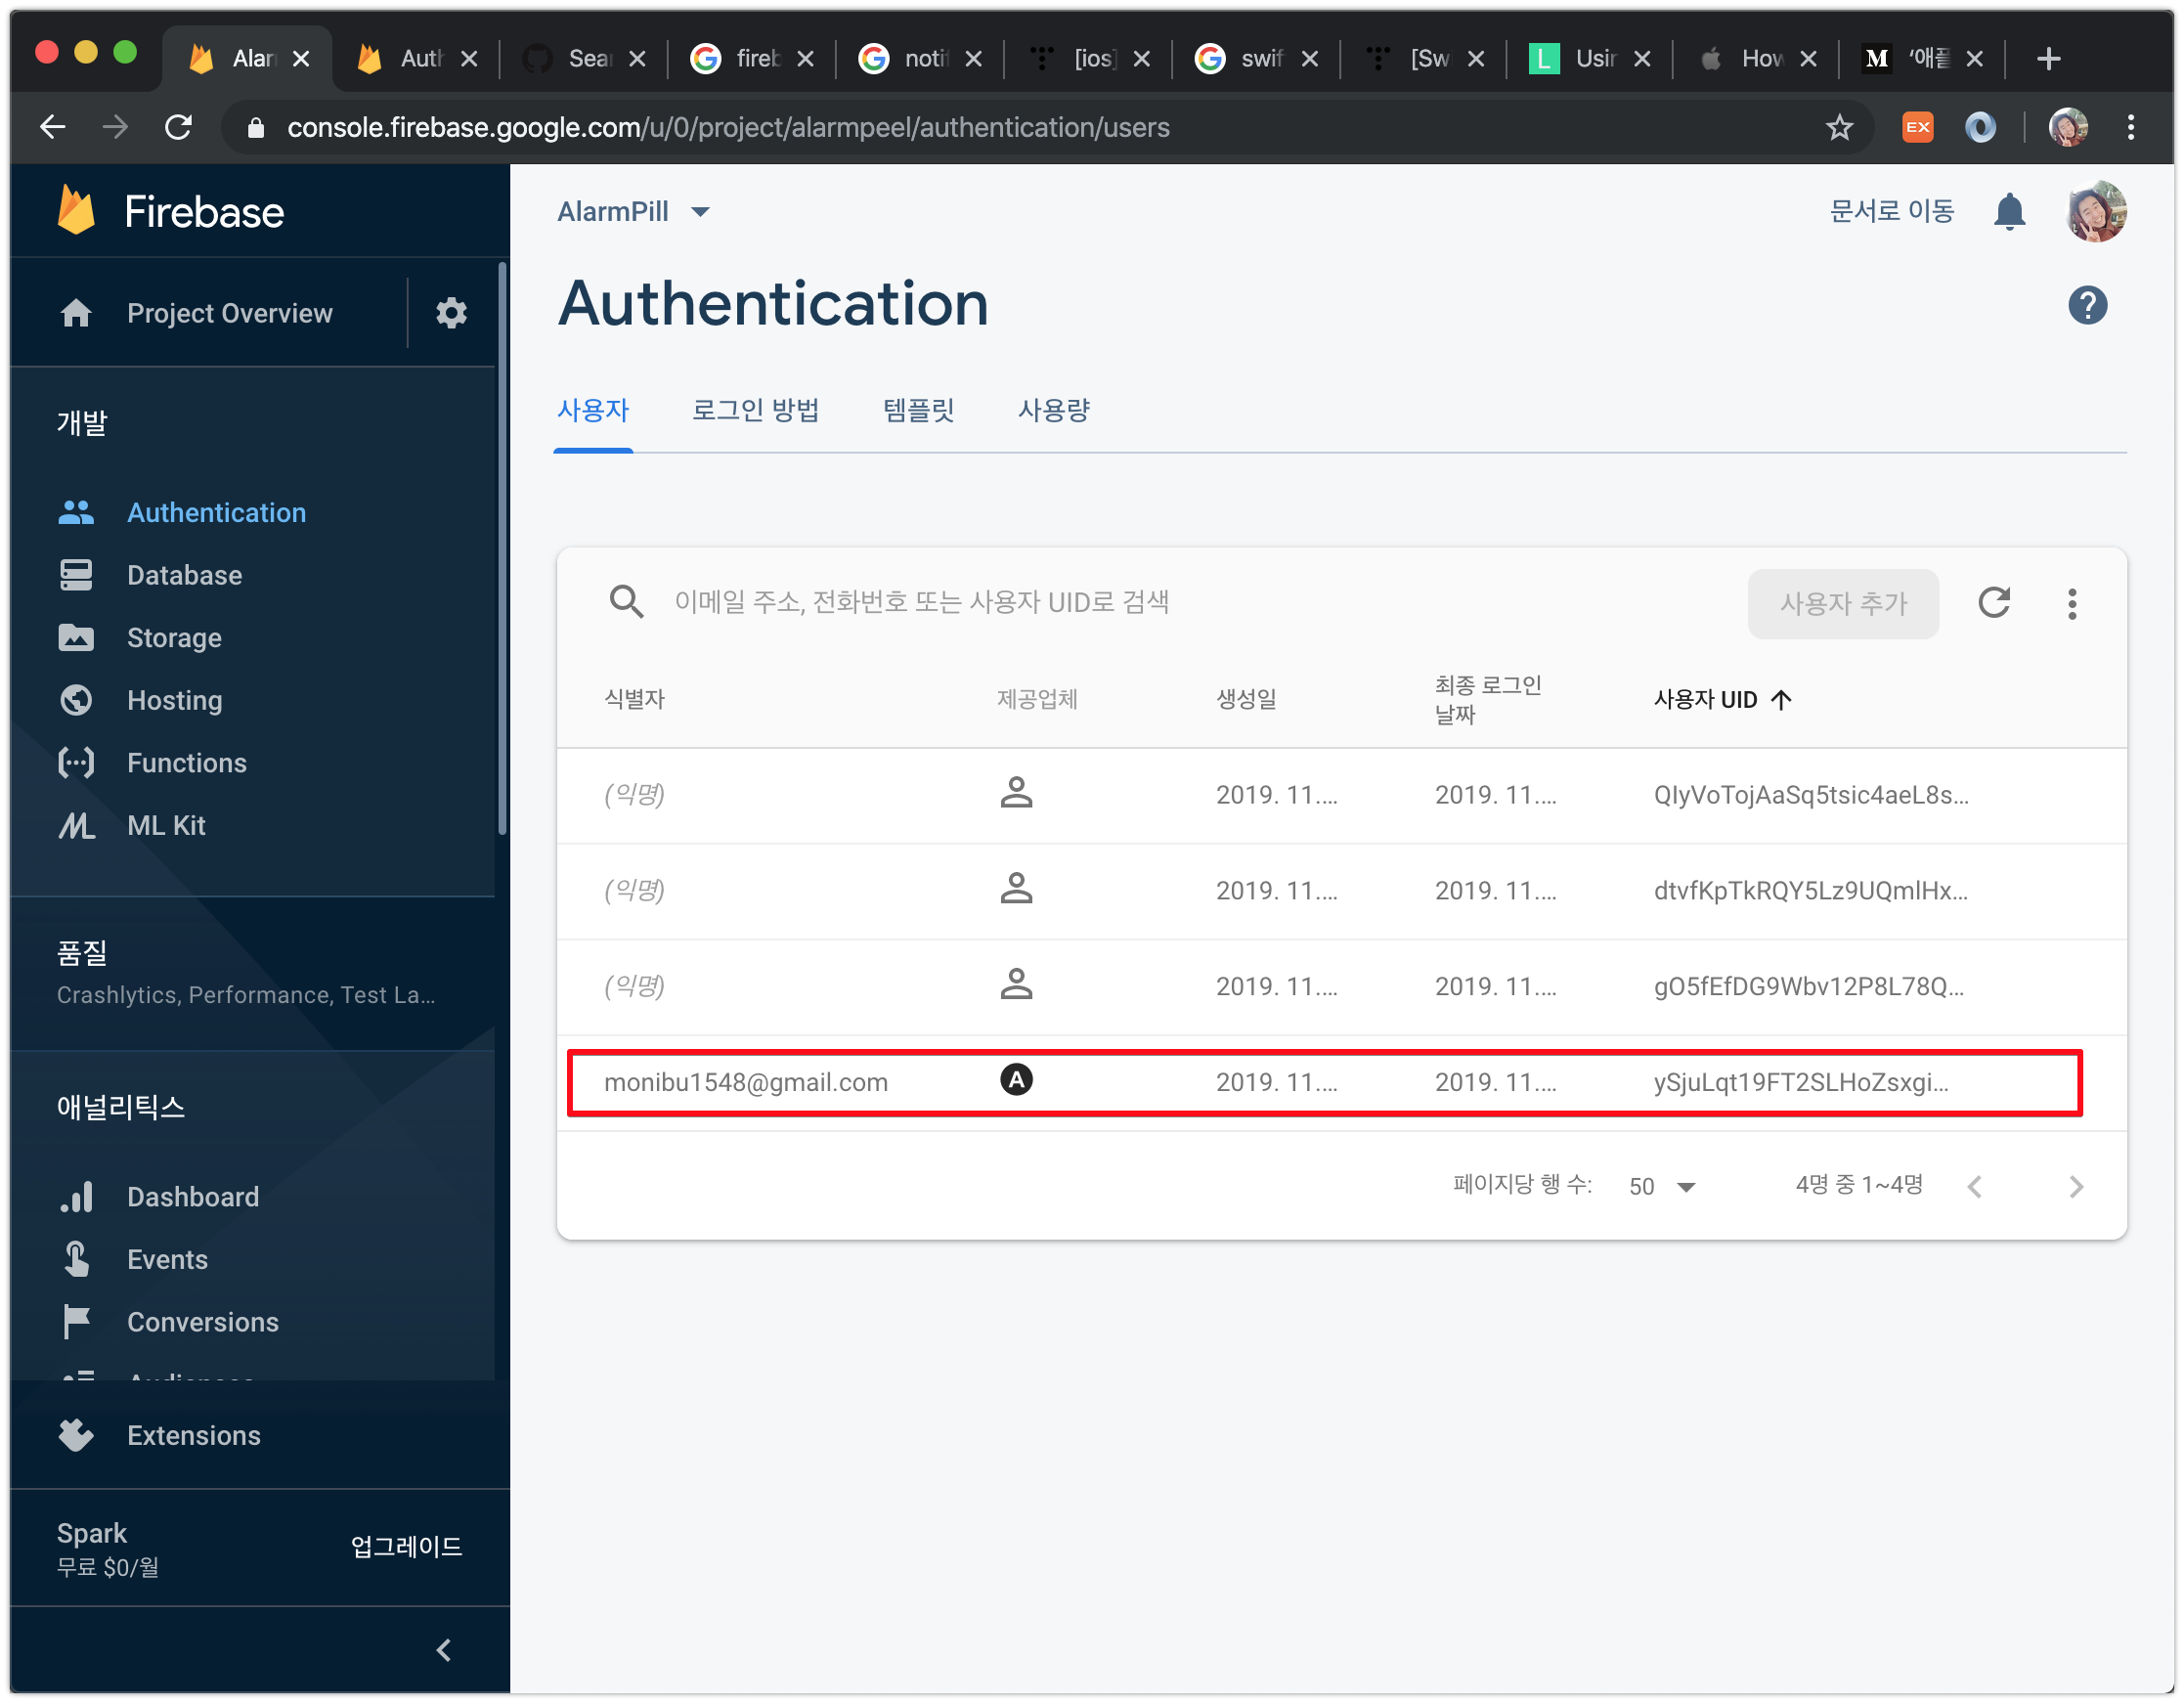
13. [Firebase Console] 로그인 확인
Apple 로그인이 정상적으로 수행되면 Firebase Console에서 아래 스크린샷처럼 확인이 가능합니다.
여기까지 완료되면 세팅은 끝. 이제 구현이 남았습니다.
Contents
- 1. Apple Login
- 2. Firebase에서의 지원 (Beta)
- 2.1. 1. [Firebase Console] Firebase Authentication > Apple Sign in 활성화
- 2.2. 2. [Firebase Console] Firebase Hosting 설정
- 2.3. 3. [Terminal] Firebase CLI 설치
- 2.4. 4. [Apple Developer Center] AppID 발급 과정에서 Sign in with apple 추가
- 2.5. 5. [Apple Developer Center] ServiceID 발급
- 2.6. 6. [Apple Developer Center] ServiceID 발급 Configure
- 2.7. 7. [Apple Developer Center] Sign In With Apple Configure 시작하기
- 2.8. 8. [Apple Developer Center] Sign In With Apple Configure 설정하기
- 2.9. 9. [Firebase Console] 애플 설정 파일 배포
- 2.10. 10. [Apple Developer Center] Sign In With Apple Configure Verify
- 2.11. 11. [Apple Developer Center] Sign In With Apple Configure Individual Email Address
- 2.12. 12. [XCode] 예제코드
- 2.13. 13. [Firebase Console] 로그인 확인